So you want to build a folding wooden chair. Great! But with so many free wooden chair plans out there, how do you know which one to use to learn how to build a folding wooden chair? With this plan, you’ll have a mix of comfort and functionality, with style and ease to go along with it. Try out this outdoor wood chair plan today!
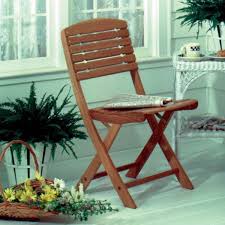
Step 1: Shape Your Patterns and Cut
The first thing you have to do is put together full-sized photocopies of the front and rear leg as well as the seat support. On a 1/8 inch-thick hardboard, place the patterns with some spray adhesive. Cut the extra side with a bandsaw, then sand until you reach the line. Cut the pieces to shape with the same procedures used to make the patterns. Drill 1/16-inch reference holes a quarter inch deep at each centerpoint. Then place twenty brass inserts on the front legs. Sand the parts finally to a smooth surface and proceed to the next step.
Step 2: The Stretchers
Prepare some overlength blanks to turn into your stretchers. Place a half inch round-over bit on your router, and then rout the blank into a dowel. Make sure to mark lines indicating where to start and stop. Now sand the stretcher until it is smooth. Cut both the front and rear stretchers: the front to 17 and 5/8 inches and the rear to 16 inches. On your tablesaw’s miter gauge, place an extension. Secure the tablesaw and cut a test tenon.
Make sure to the check test tenon and how it fits in the ¾ inch hole that was drilled out previously. Adjust the blade until the test tenon fits perfectly, and now cut the stretchers’ tenons. On your workbench, clamp a stretcher. Now mark the kerfs on each end of the tenon and cut them to the shoulder with a backsaw. Sand until it is smooth.
Step 3: Assembling the Stretchers and Legs
Fit together the stretcher and the legs without any glue. Clamp these pieces together; the tenons’ shoulders with the legs. With weatherproof glue, now you can clamp the pieces together. The curved side of the legs should be faced upward, allowing the four points to press against the saw table’s flat surface.
Keep parallel spacing by clamping the scrapwood spacers. Now align the kerf; keep it straight against the foot’s angle, allowing the wedges to stay at the same level as the floor. Tap the wedges in place with your hammer after gluing them. When everything is dry, unclamp the pieces and sand the edges.
Step 4: The Seats
Rip half inch-thick stock, creating the back and seat slats for your chair. Try to rip a few extra pieces for later, for use with machining operations. Now rip half inch-thick stock, three inches wide, for the oversized blanks for the slats. Crosscut the slats to length; use a stopblock on your tablesaw’s miter gauge to keep everything uniform.
At the end of each slat, cut rabbets. Photocopies of the slats should be made, which will be attached to the hardboard. To clear the waste and sand the line, use a bandsaw. Drill a reference hole to mark the screw’s centerpoints; use these holes as guides to drill reference holes into the slats, a quarter inch deep. Place a 1 ½ inch sanding drum on your drill press and proceed to place the 3 inch wide fence underneath the drum. Give the sandring drum clearance with a large cutout in the fence, then use the bandsaw to shape it.
On the fence, place a stopblock then pivot the slat over the drum to help smooth what you have cut. Mark the locations of cutouts on the back. Finally, cut the notches and sand. Next, with a 3/8” round-over bit on your router, readjust the fence flush with the bearing of the bit. On these parts, round over the curved edges. Drill countersunk holes in the slats where marked with a stopblock and fence on your drill-press. Sand everything to a final smooth quality.
Step 5: Attaching the Slats
Place the front seat slats between the seat supports; clamp these slats to the support to keep the assembly fit. With the holes you drilled as your guides, place 7/8” deep pilot holes in the seat supports, then screw. Apply glue on the rabbets. Afterwards, place a ¼ inch thick spacer in the space between the first seat and front seat slats. Do this again until all the seat slats are worked on. Now you can sand the ends of the slats and glue and screw the top and back slats on the assembly.
Step 6: Shaping the Brass Parts
You will use two straps per chair, so it is important to make one photocopy for each strap of the brass strap pattern. Shape the blank with a bandsaw or a scrollsaw, and smooth the blanks’ ends with a disk sander. Use a scratch awl or centerpunch to indent holes in the centerpoints. Drill these holes with your drill press. Finally, cut brass pipe nipple to ¾ inch lengths with a hacksaw or a scrollsaw, then file each end square after you are done with cutting.
Final Step: Assembly
Before you assemble it, you will want to test assemble your chair; do this by sticking the seat assemble to the front-leg with screws and brushings. Now attach the rear to the front, and attach brass straps with more screws. If the assembly fits properly, you’re ready for a real assembly.
Disassemble your test assembly and then place the brass pipe-nipple bushings with epoxy. Sand if you still have to. Finally, it’s time to finish your assemblies, with four coats of Miinwax Fast-Drying Clear Satin Polyurethane, then wipe it off with tack cloth, ensuring the sanding dust is all removed. Now reassemble the chair for the final time with a thread-locking compound, and enjoy your foldable chair! Did you enjoy learning how to build a folding chair? Try out some more foldable chair plans here!

Furniture designers have been playing around with the idea of knockdown furniture for centuries. The greatest appeal has always been that it allowed people without advanced tools to put together practical furniture with simplicity, such as the ever-popular trestle table. So why not try the same approach for some easy wood coffee table plans in just three simple steps?
Why a Wood Coffee Table?
There’s a reason why they say the classics are the best: we’ve drawn up a great wooden coffee table plan that will fit into any house looking for that rustic, burgundy aesthetic. With nothing more than bit of elbow grease and some light hand tools, you can construct your own wooden coffee table from ordinary one-inch common pine today.
Before you get started, remember: like always, be careful when you pick your wood, especially because the table will be clear-finished and stained. Essentially, you will want to find pieces with no bows or bends, and a few more than you necessarily need just in case you run into knots or other problems.
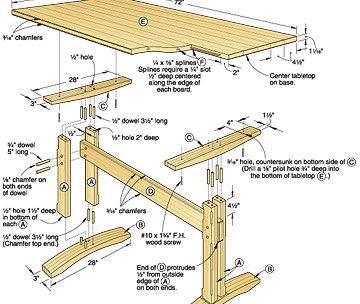
Step 1: The Top
Crosscut five 1 x 6 boards with a circular saw, but remember that each board should have a little extra length. Afterwards, with a straight strip to help, use a hand plane to join the edges after tearing the boards with too much width.
Next, sort the boards you have in a pattern where their annual rings of adjacent boards are on opposite ends; then on the plate-joint centers, place a mark. With a joiner and the work on a flat and safe surface, begin to cut the plate slots. Remember—it is important to align the upper surfaces of your boards, so make sure to keep each board facing down.
With glue in the slots, it’s time to put together the tabletop and slide in the plates. Then with pipe clamps, lock in the table top. You may find yourself having trouble with a buckling top, so be sure to clamp 2 x 4 pieces with waxed paper beneath them beneath the boards. The waxed paper stops them from sticking to the glue on the top. Scrape off the extra glue after it has dried with a paint scraper, and then with a cabinet scraper, start smoothing out the joints. With a belt sander, pad sander, and or/random-orbit, even out the rest of the surface. When everything is done, you can now to the specified width and length.
It’s now time to focus on each corner where you will cut the radius. To do this, use your sabre saw with a circle-cutting guide, and set a three-inch pivot point on the bottom of the top from every edge. Make the cuts, rout the chamfer around the tabletop’s lower edge, and then smooth out the top.
Step 2: The Beam
First thing’s first: Cut two 48 inch lengths of 1 x4 stock so that you can build the trestle beam, which should be 1.5 inches thick. To set alignment holes between the boards, nail them together temporarily. Now you have to establish the mortise locations, which you will do with a square and rule. Afterwards, pull apart the boards and pull the lines to the workpieces’ mating faces.
Now you have to focus on creating the beam tenons. Firstly, on the workpieces’ ends, place the shoulder cuts. Use a clamp to clamp together a pair of 3/4 x 1 1/2 x 14-inch boards, creating a strong and wide foundation for your router with each beam face at either end. Add about an extra half inch to the tenon’s length with guide strips with your cardboard spacer.
Now you can do the cut after the strips have been tacked to the beam. Do the process again with broad cheek tenon cuts after the bottom and top shoulder cuts have been finished. Stick pieces of 1 x4 stock together to make the feet and leg blanks. Ready the pieces that are longer than the specified length and hammer some nails in the extra area at each end, keeping the pieces from moving as you glue and clamp them. After the glue has dried, begin to plane the edges.
Step 3: Legs
At both ends of each mortise, drill in ¾ inch holes, then with a sabre saw, smooth out the rest of the waste. At the end of the beam tenon, remove a slice of cross-section. Place this on the outline of the leg mortise and then create a template frame around it with plywood strips. In your router, install a template bit; make sure that above the cutting edges there is a pilot bearing. Align the plywood frame with the bearing and make your first cut. After that, guide the first cut by adjusting your bit and then finish your mortise. With a chisel, smooth out the edges.
It’s time to cut to the exact length and width on the battens and feet. Make note of the positions of the leg face by marking the battens and feet blank, then make note of the pieces’ centerlines. Steady the edge and hold it in place with your foot as you use the plate joiner to slice a cut over the leg face position, about 7/16 inches above. After your first slot, cut the second slot after raising the joiner with a 5/8 inch thick shim.
In the leg ends, cut the slots. Use your joiner and stock to cut the first set of slots. For the second set, raise the joiner to 5/8 inch shim. Make sure that for the first bevel cut you make, you mark the feet ends. The cut should be made with a handsaw; afterwards, plane it until it becomes smooth. Then you must shape the sloping face bevel with your hand plane after marking it. Finally, mold the compound bevel.
Final Step: Assembly
You’re almost done with your easy wood coffee table plan. Remove any excess from the bevel ends flat and rout the chamfers. Now put together the feet, battens, and legs. Put together the table base and create your beam wedges. With a drill, make a half inch hole in all of your battens. Fill these holes with dowel centers and—after aligning the top—push to down. Secure each batten by gluing in a half inch dowel.
When your table is assembled, now you can finish it up with your Minwax Wood Conditioner. Finish the job with three coats of Minwax Clear Semi-Gloss Polycrylic Finish and a pair of coats of Minwax Colonial Maple Stain, for that real wooden look. Now you’re done with this expertly-designed furniture plan! If you liked this one, here are a few more free furniture plans you can try out. Enjoy!

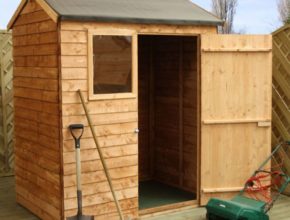
A garden shed can be a wonderful addition to any home’s backyard, but learning how to build a garden storage wood shed can be pretty tricky. However, by looking through the best wood shed plans, you can actually find one that can make building one pretty easy. Whether you want a simple lean-to or a large-free standing building (or one of any other of the many garden shed designs), you can find garden shed plans for all types.
With this plan, you’ll find yourself making a modest 6 x 8-ft garden shed, which can hold all of your tools but doesn’t completely dominate your backyard. With this straightforward and easy design, you’ll be able to build your one or several outdoor storage wooden sheds in no time.
Step 1: Preparing the Site
The first thing you’ll have to do is mark out the site of your future shed. A lightweight frame that will be the exact size of the shed is best for this. You can build this frame from ¾-inch thick pine, with screws in each corner fastening the sides together in a rectangle.
Clear the site of your shed and tear down any high spots. Adjust the frame in position until you find a suitable place for the shed, then mark the corners with stakes and remove the frame. At the highest corner of the site, start your excavation for your first foundation corner block. Dig out an area larger than the block, with about two or three inches of crushed stone to act as the base for the block.
Now you can position your block, which should have three to four inches exposed above the ground. Make sure that the block is secure with the crushed stone, and then add the other corner blocks the same way.
Step 2: The Floor
For the floor, the best material is pressure-treated lumber. 2x 6 stock to length is needed for the back and front rim joists; lay these out on 16 inch centers. Use nails to stick joist hangers on the inside of every inner joist, then set the joists between the corner blocks and position these floor joists. Nail them in place, then make sure to secure the back and front of the floor frame with the outer rim joists.
Step 3: Making the Wall
For the window and door headers, you will need 2 x 6 stock. Nail these header pieces together, and then cut 2x 4 stock to length for door jack studs, wall studs, and windows. On the wall stud, nail each jack stud, then nail 2 x 4 spacers between a pair of studs to create the four corner posts.
Next you will want to frame the back wall. Lay out the stud locations on bottom and top plates, and then set the framing members on the deck. Secure the bottom plate and the top plate by nailing through and into wall the wall members. For the window opening you will want to frame it with nails as well.
Now examine your wall and adjust the current assembly if required, until it becomes square. Afterwards, use 6d nails about six inches apart to set a half inch plywood sheathing. Brace the rear wall by nailing 2 x 4s between the wall and the outside floor joists. TO make the plywood sheathing flush with the deck’s edge, nail the bottom plate to the deck.
Put a frame over the front wall and brace it after standing it. Then repeat with the side walls. Nail all the walls at the corners, and install the wide wall top plates to keep them standing. Check if they are straight with a level.
Step 4: The Roof’s Frame
Spread your 5-inch pitch on the roof rafter with a framing square, then cut the rafter to use as a pattern for a second rafter. Make sure that both of these fit properly before cutting out the rest of the rafters. Now, use a half inch thick plywood from where you will cut a gusset. Draw the roof truss’s outline on the surface of the plywood. Then nail the rafters and gusset together with 2 inch roofing nails.
After nailing the trusses to the walls—both rear and front—make sure to keep the inside faces of the trusses with the gussets at the gable ends. For the subfascia, you will need to cut 2 x 6 stock to length; nail these boards to the rafter ends before installing your gable-end sheathing, then over the gable rafters you will want to nail your pine furring.
For the back and front soffits, you will want to rip cedar stock to width. Nail the subfascia, rafters, and soffit boards together with galvanized nails, then install the fascia. Finally, while installing your roof deck, make sure to let it overhang the fascia by about half an inch. Apply toe roofing felt after nailing aluminum drip edge to your roof’s eaves, and lastly, along the rake edges you need to install the drip edge.
Step 5: Roof and Sides
About halfway up the wall, you’ll need to place about 2x 4 nailing blocks between each stud, because of the vertical installation of the tongue-and-groove siding. It will help to complete the roof trim before applying your siding, if you ever intend to paint or stain the trim a color different from the shed siding. Do this by installing the siding boards at a single corner. Fasten the boards with 8d nails; drive the nails diagonally through the tongue, allowing the heads to hide. The nailheads should be a little below the surface of the wood.
Step 6: Doors and Windows
It’s now time to install your window and door jambs. The jams should be nailed directly on the framing. The sill pieces should be sloped around five degrees pointing to the outside; next, cut the side jambs and add the top jambs to secure it. From 1x cedar stock, cut out your stops for the windows, then use galvanized nails to install the outer stops. The inner stops should be installed after you have placed the windows in the openings.
Cut your pieces of shed corner boards and door and window trim from rough-sawn cedar, then nail these in place. When clamping on the siding boards for the shed door, don’t use glue, just joints. Screw the battens to the inside of the boards. Then install the door hinges in bored pilot holes, and position the door with a quarter inch of space on every side. Nail the doorstops in place on the open-side and top jamb. Finally, paint or stain as you please. Never find yourself asking how to build a garden storage wood shed again!
For additional woodworking plans, please visit JoineryPlans website