
“You built that yourself?” When someone says that with amazement as they look at a piece I made, it sends a shiver of pride up my spine. Nothing is more rewarding than taking a seemingly random stack of wood, a few screws and some glue, and turning it into a beautiful and long-lasting piece for your home.
The skills needed to build simple wood projects from raw materials aren’t difficult. But it can be daunting if you don’t know where to begin. Fortunately, you have come to the right place. Even if you’ve never done it before, I’m giving you 3 easy woodworking project plans for beginners. We’re going to start out very simply for the first project. Then expand on the skills you learned, and add to them for our second creation. And finally, the third project will elevate the complexity. By the time you have finished all 3 of these beginner woodworking projects, you will be ready to build just about anything.
Gravity-Defying Wine Rack
This is literally one piece of wood, with a hole in it for the neck of the wine bottle to stick through. The bottle will simply float in a mind-warping horizontal pose that just can’t be true. But it is. The secret to this balancing act lies entirely in the angle you will cut at the base of the wood.
This is one of the best simple wood projects to learn from, because it will teach you 3 basic skills. You will first measure very accurately. Then you will saw the angle. Finally, you will drill the hole. Once you conquer those 3 skills, you’re off and running.
Supplies and Tools
A 15”x 31⁄8” x ¾” hardwood board of your choice. Think oak, maple, cherry, or even redwood.
Paint or stain, whichever you prefer.
Tape Measure
Pencil
Straight Edge
Miter saw
Drill with 1 ½” wood bit
Medium and fine grit sandpaper
Cutting the Base Edge
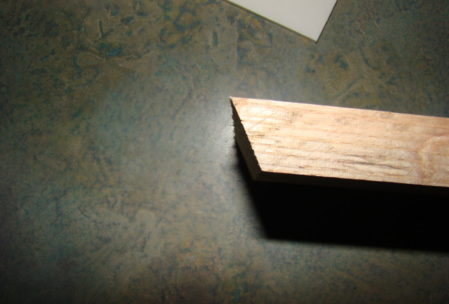
The 27° angle of this edge is the whole reason this wine rack works, so it must be cut perfectly. As my high school woodworking teacher Mr. Hauke relentlessly drilled into me, “Measure twice, cut once.” So, be sure you have these measurements exact before you pick up the saw.
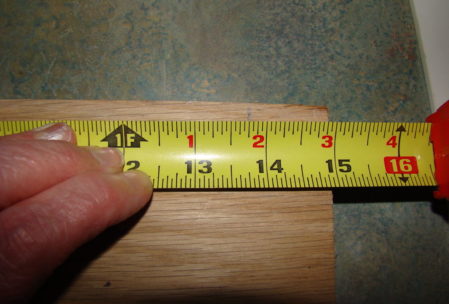
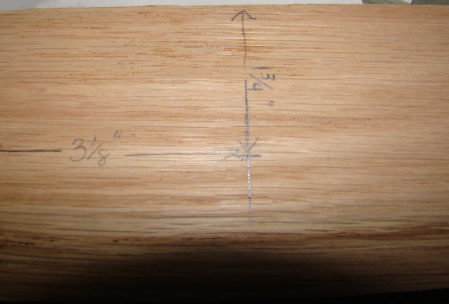
From the top end of the board, measure down exactly 14 1⁄8 “ and draw a straight line across the face of your board.
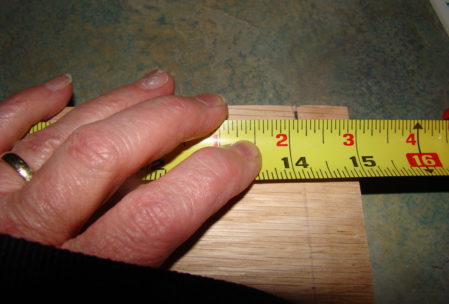
Flip the board over, and draw a line at 13 ¾”.
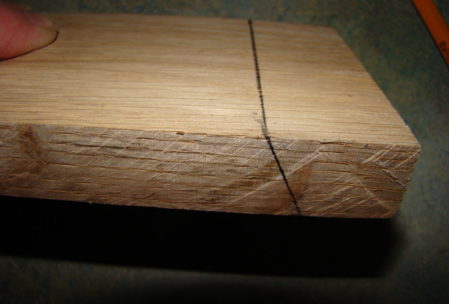
Now turn the board on edge and connect the two lines. If your measurements are exact, this line will be that 27° angle we’re looking for. To make Mr. Hauke happy, measure it again.
Using your miter saw (this can be a hand-powered or electric model, your choice) cut along this line as exactly as you measured it.
Drilling the Hole
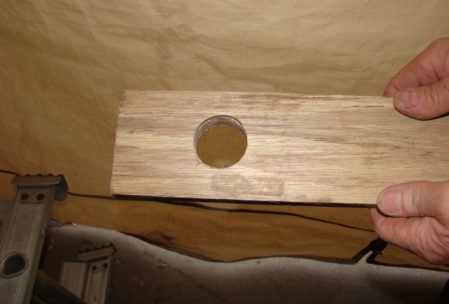
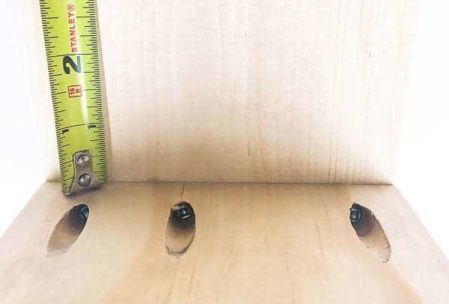
From the other end of the board (which will be the top of our wine rack) measure down 3 1⁄8” and draw a line. Find the center point of that line ( 1 5⁄8 “ if you are using a 3 1⁄8 “ board) and draw an intersecting line. The resulting X marks the spot for your drill bit.
Carefully drill the hole all the way through, generating as little splintering around the hole as possible.
Finish
Now sand the entire piece and all of the edges, first with the medium grit sandpaper, and then with the fine grit. Apply the paint or stain according to the manufacturer’s directions.
Once the finish has dried, it’s time to make magic. Place the neck of the wine bottle through the hole and set it up on that angled edge that you cut so carefully. You may have to adjust the neck of the bottle forward or back a little bit to get the balance just right. But once you do, the bottle will be suspended in space until you decide to drink it in celebration of creating the 3 easy woodworking projects.
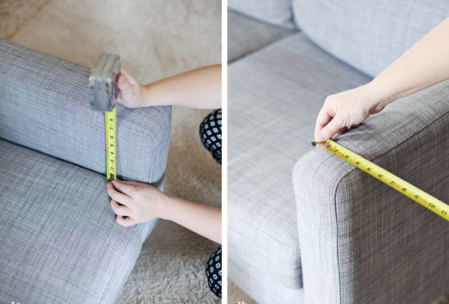
Sofa Arm Sleeve with Cup Holder
You’ve seen the sofas with built-in cupholders. It might be great on game day, but looks pretty tacky when you’re hosting a more formal affair. The next of our 3 easy wood projects gives you the best of both worlds. In fact, it’s even better than the built-in cupholders, because this one will hold a book or plate full of munchies, too.
Supplies and Tools
A 3⁄4 “ thick hardwood board cut into 3 equal lengths – we will determine the exact dimensions in our first step
A small piece of 1⁄8“ plywood – size TBD. This can usually be found at a local craft store.
Medium and fine grit sandpaper
Wood Glue (Elmer’s WoodGlue Max® is my favorite)
Wood stain
Polyurethane for water-proofing (if desired)
Tape Measure
Straight Edge
Pencil
Drill with a hole saw bit large enough to accommodate the base of your favorite beverage glass
2 clamps at least 8” long
Kreg® pocket hole kit (I’ll explain when we get to it)
Getting Started
Measure the height of your sofa arm above the top of the cushion. Your board can be no wider than this measurement. The simplest thing is to go down to the next standard width of board. For example, if the sofa arm extends 8 inches above the cushion, I would go with 6” wide lumber.
A length of 14 inches will give you a long enough sleeve to accommodate both your cup and a small plate or other items. Since the top of the arm is narrower, you will have to trim the width of that piece. Measure the arm top and add 1 1⁄2” for the thickness of the side boards. For example, if the arm is 4 inches wide, the top wood piece should measure 5 1⁄2” wide.
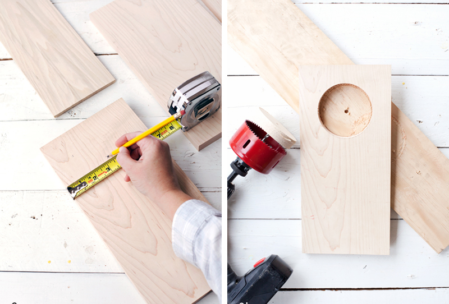
Drilling
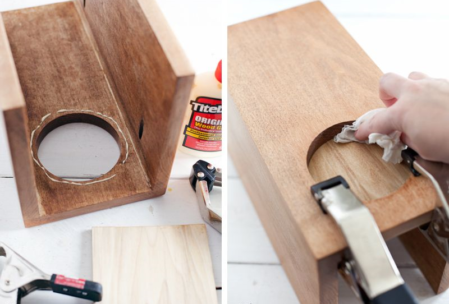
Using the technique for finding the center of the hole that you learned while making the wine holder, mark the spot for the center of your hole saw, making sure to leave at least an inch of wood between the hole and the front edge of the board. Then carefully drill the hole.
Next we’re going to use the Kreg® pocket hole drilling jig to make 2 perfectly angled holes on the inside of the side boards of our sleeve. Measure about three inches in from the ends of each board, and clamp the jig in place.

Follow the instructions with the jig to drill these holes, which will only be seen from the inside of the sleeve. The jig is an ingenious device that gives easy wood projects a very professional look. But practice on a piece of scrapwood first to make sure you have it down. Learn more about the Kreg Jig R3 here.
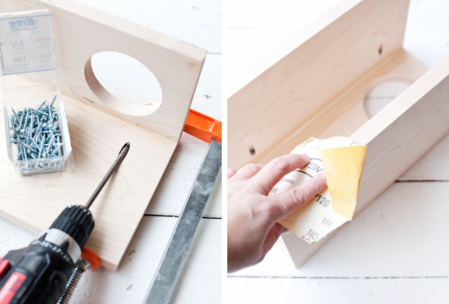
Put it all together
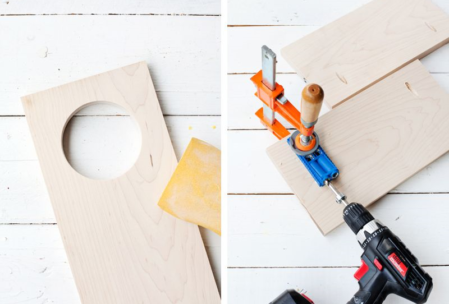
Spread a very thin layer of glue on the edge of one board that has the pocket holes drilled in it. Clamp the piece in place against the top board, being certain that all of your edges line up perfectly and the pocket holes are facing the inside. Be sure to immediately wipe away any glue that squeezes out of the seam. Glue residue will ruin your stain job. Now insert the pocket screws and allow the glue to dry. Then, glue, clamp and screw the other side in place. Once the sides are in place, give the edges a good sanding to round them a bit. That way they won’t snag on the sofa covering.
Glue a small piece of thin plywood to the underside of the cup hole, clamping it in place and again being careful to quickly wipe away excess glue.
Sand the entire piece as smooth as possible, and apply your stain. If you want it to be waterproof, apply a finishing coat of polyurethane.
Adjustable Desktop Organizer
I’m going to finish this list of 3 Easy Woodworking Project Plans for Beginners with a project that, if you built the first two beginner woodworking projects, you already know how to build. But it will help elevate your skills to a new level.
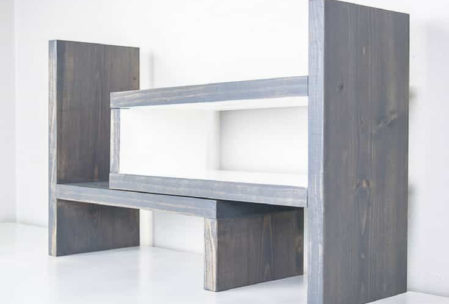
This is a desktop organizer than can be arranged in a variety of ways. It can be set up straight, or on a corner.
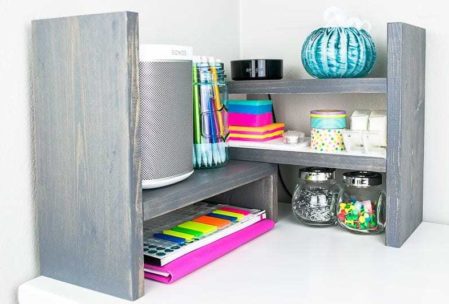
The length can be varied by pushing two pieces together, or sliding them wider apart. The concept can also be scaled up or down by using different sized lumber. For demonstration purposes, we’re going with 6-inch wide lumber.
Supplies and Tools
1x6x6 foot hardwood board (which is really 3⁄4” thick)
Pocket Hole Screws
Wood Glue
1 ½” brad nails
Medium and Fine grit sandpaper
Saw
Drill
2 clamps at least 8” long
Kreg® Pocket Hole Jig
Prepping the lumber
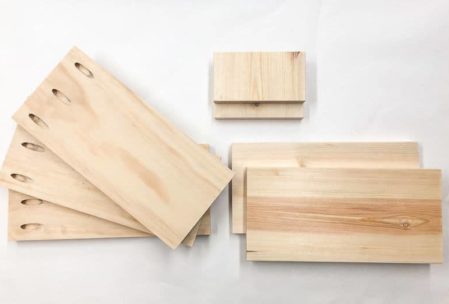
Cut the board into three 12” long pieces, two 11 1⁄4” pieces, and two 3” pieces.
Drill three pocket holes into one end on each of the three 12” pieces. These will form the shelves.
Putting it together
Measure three inches from the bottom edge of one of the 11 1⁄4” pieces, and draw a line. Lay a thin film of glue along the pocket screw end of a board. Place the bottom edge of this board above the line and insert the pocket screws.
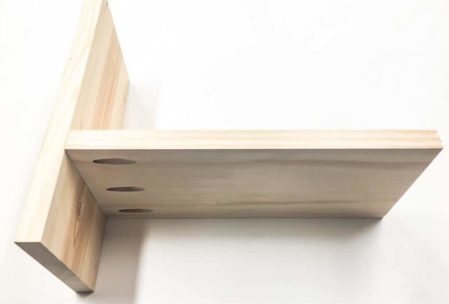
Place glue on the top edge of a 3” piece, and clamp it in place under the other end of the shelf board. Clamp it and secure with brad nails (or 1 1/2” wood screws, if you prefer).
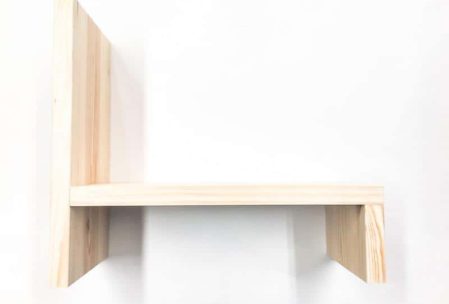
Using the same glue and screw technique, attach another shelf to the other 11 1⁄4” piece exactly 3 3⁄4“ up from the bottom, and the third shelf exactly 3” above the top of the first shelf.
Secure the remaining 3” piece between the open end of those 2 shelves. Glue, clamp and secure with brad nails.

Sand and finish the same way you did for the other 2 easy wood projects.

Congratulations!
You did it! You completed our 3 Easy Woodworking Project Plans for Beginners. These are very easy woodworking projects to help you get your feet wet. Or should I say, to get them covered in sawdust? And while these may be very simple wood projects, their real value is in helping you learn some of the most important basic skills you need to be ready to build anything. Make sure to check out also The 5 First Steps To Get Started With Woodworking article.