Unless you have studied industrial design or architecture, you may never have heard of a man by the name of George Nelson. But his singular genius affects almost everything you create in your woodworking shop. Nelson hit his stride as a designer in the 1940’s, and by the mid-50’s he had essentially created a style we now call Modernism. Simple, clean-lined furniture that puts form before function, but never at the expense of a definite style. It’s the kind of work that, as a woodworker, my jealous inner-voice says, “Now, why didn’t I think of that?”
1 – Platform Bed
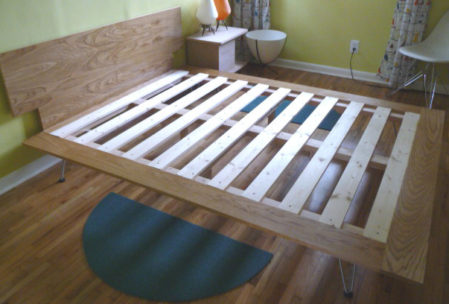
Put that green-eyed monster away, and let’s get started on a DIY furniture plan for building a platform bed that looks like it just came out of a George Nelson museum display.
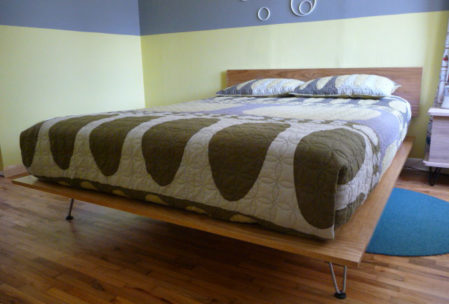
This platform bed uses 2×6 and 2×4 components for a sturdy frame, and is edged with beautiful Red Oak. The plan we are using is for a Queen-Size bed. If you need a full or King instead, adjust your measurements accordingly. The headboard is made of furniture grade oak plywood. You could also make it from solid oak if you want to take the time to edge glue the boards together and detail the edges with your router. As in all good DIY plans, there is room for personal expression. Make it yours!
Materials
- (2) 2x6x79”
- (2) 2x6x47” (NOTE: a 79” and 47” length equal 10 ½ feet. If you can transport and handle a 12’ long 2×6, you can save some money. You need two of them. Cut them to the needed lengths.)
- (1) 2x4x68”
- (2) 2x4x21 ¾” (NOTE: You can cut these 3 pieces from a single 10-foot 2×4)
- (1) 1x6x64” Red Oak Board
- (2) 1x6x76 ½” Red Oak Boards
- (1) 1x3x53” Red Oak Board
- (11) 1x4x52 ½” Pine Boards (for slats under the mattress)
- (1) 22×64” Furniture Grade Oak Plywood
- (9) 10-inch metal flat brackets
- (2) 10-inch metal “L” brackets
- 1 ¼” wood screws
- Iron-on Oak Veneer Edge Banding
- Wood Glue
- Wood filler or Oak Plugs
- Stain
- (8) Hairpin legs – The best source I have found for these is this. They have many different styles and sizes. The choice is up to you. You could also use four 2×2 wooden legs in the center of the frame, as in our example. Then you would only need 4 hairpins. Just remember these legs have to be exactly the same length. Using all hairpins will cost a little more, but it eliminates one headache.
Tools
- Drill and Bits
- Miter saw
- Clamps
- Tape Measure
- Carpenter’s Square
- Pencil
- Screw Driver
Build the Frame
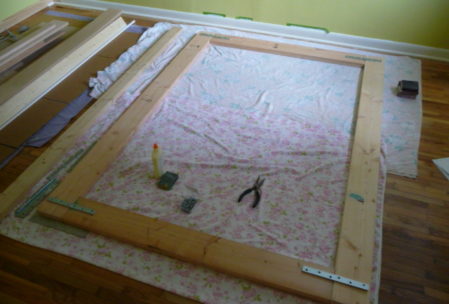
Lay out the 2×6 pieces in a perfectly rectangular shape, placing the shorter end pieces inside the long ones. Use your carpenter’s square to be sure it is perfect. Apply some glue to these joints and then screw the joints together with flat metal braces.
Place the long 2×4 down the center of this frame, and the two short 2×4 pieces as crossmembers in the middle of the frame’s length. Glue and use metal braces on all of these joints.
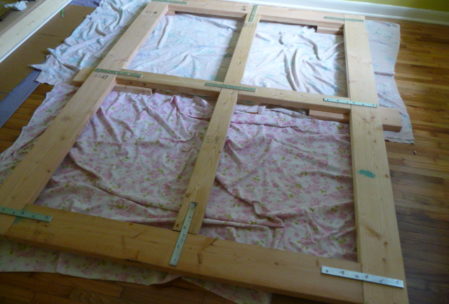
Before we go any further, I want to point out one thing here. If I was building this bed for myself, I would do these joints differently. I would mate all of these corners at 45° angles (cutting the length of the 2×6’s accordingly) and countersink screws in from the edges for a stronger joint. If I was feeling really diligent, I would even turn these into mortise and tenon or bridle joints. Just sayin’…
Now attach the legs, one in each corner and the other four closer to the center on the 2×4 braces.
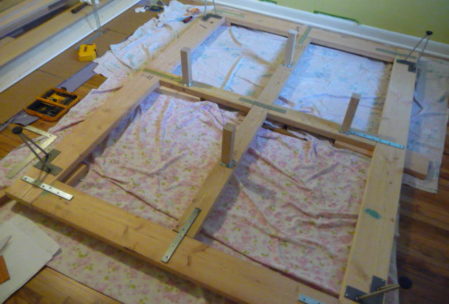
Once the glue is dry. Flip the frame right-side up. Attach the Red Oak rails so that the edges overhang the 2×6 frame by 3 inches on each side and at the bottom. The bottom board goes inside the edges of the side pieces. Screw the Oak onto the frame about two inches from the inside edge, so that the mattress will cover the screws. Measure your mattress to see where these screws should go. Fill or plug the screw holes, then sand and stain the Oak.
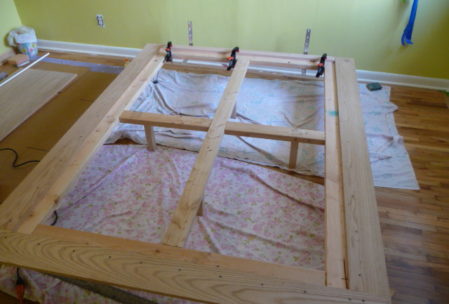
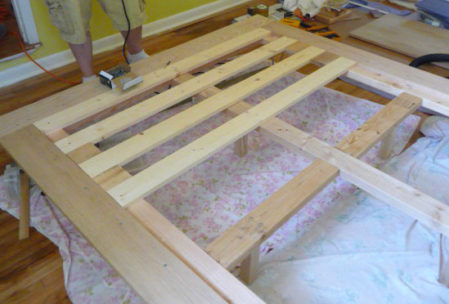
Now lay the Slats over the frame, spacing them evenly, and screw them into place. Finally, attach the “L” brackets to the top end of the support frame close to either end. The headboard will mount to these brackets.
The Headboard
This headboard has a square notch cut out of the bottom corners on either side. Since this is a plywood headboard, an iron-on oak veneer is applied to the edges, and then the entire piece is stained to match the siderails. Then, it is simply attached to the “L” brackets.
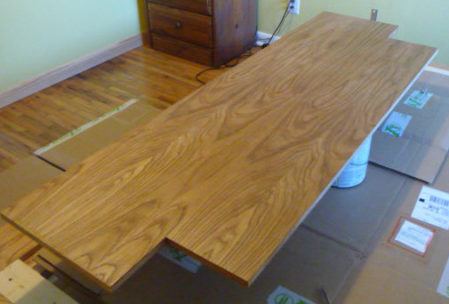
There’s a lot of personal taste in how you do the headboard, so apply your creative skills here. Like I said, you could use more Red Oak boards edge-glued together for a gorgeous look. Just remember that, if you are looking to maintain the Modernistic design of this bed, keep it fairly square and simple.
2 – Matching Night Stands
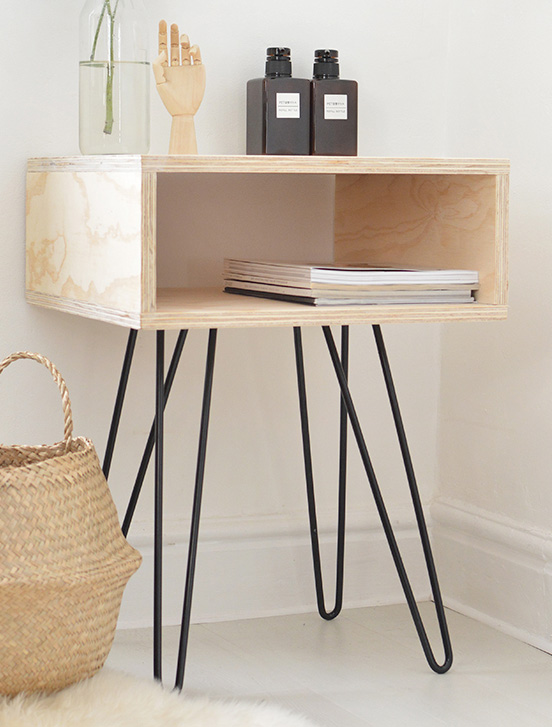
Now that you have the bed built, let’s add a night stands to finish the room in style. The materials list below is for a single night stand. Double it if you plan to make two.
Materials
- (2) 18×18” pieces of furniture grade Oak plywood
- (2) 6×18” pieces of furniture grade Oak plywood
- (4) Pocket screws
- (4) 1 ½” wood screws
- Wood glue
- Iron-on Oak Veneer edge banding
- (4) Hairpin legs (Make them tall enough to be the proper height for the bed you have made)
Tools
- Table or circular saw
- Drill
- Kreg® pocket screw jig
- Clamps
- Screwdriver
The Build
Since you have already built the bedframe, this is easy. First, cut the plywood to the dimensions in our materials list. Using the pocket hole jig, drill two pocket holes at the top edge of each of the 6-inch pieces. Apply some glue and firmly clamp one side piece at a 90° angle to the bottom side of the top piece. Insert the pocket screws. Repeat for the other side piece.
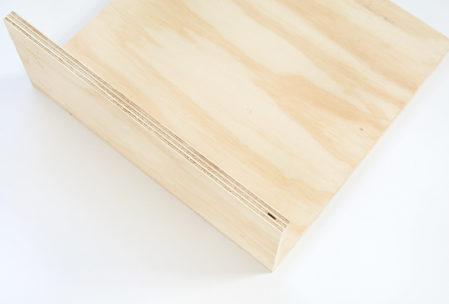
Once the glue has dried, flip the piece over and predrill holes for screws to mount the side pieces from the bottom. There is no need for pocket screws here, because since the screws come up from under the bottom piece of plywood, they won’t be seen by anyone but your cat (Hint: He doesn’t care). Apply some glue to the bottom edge of the side pieces, and screw the base into place.
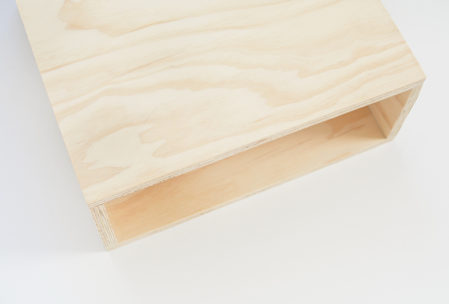
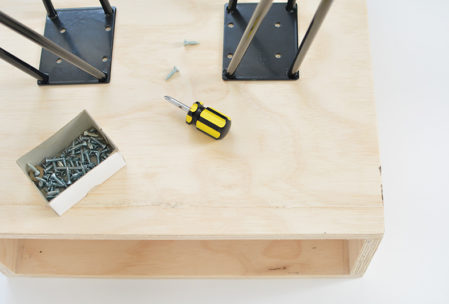
Install the hairpin legs. Apply the iron-on veneer to the front edges and stain to match the bedframe.
Congratulations! You can sleep easy knowing that you have just used your woodworking skills to build a modern-style bedroom set for a small fraction of the cost that it would cost to buy the same thing.
2 – Modern Outdoor Lounger
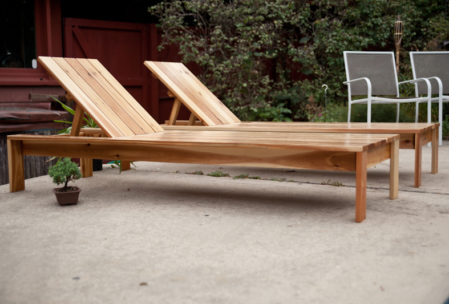
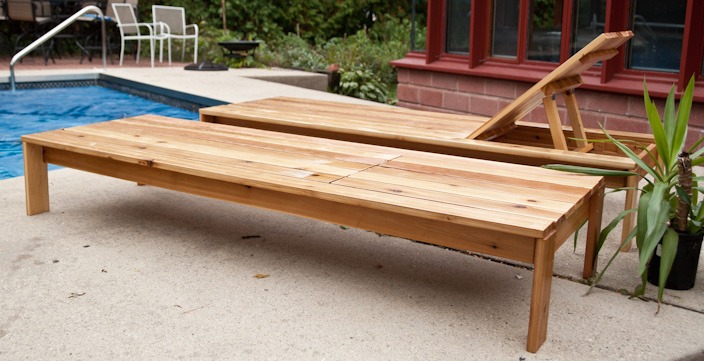
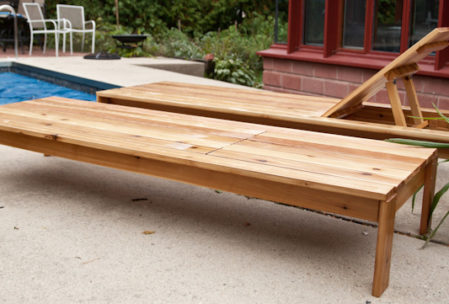
Since you have decided to go the Modern design route, let’s take it outside with this modern version of the classic poolside lounge chair. We’ll use Cedar out here because it’s beautiful, and as weather resistant as any wood gets.
Materials
- (2) 1x4x73” boards for the apron sides
- (2) 1x4x30” boards for the apron ends
- (3) 1x4x28 ½” boards for crossmembers
- (4) 1x4x12” boards for the legs
- (2) 1x4x76” boards for the edge pieces of the deck
- (5) 1x4x51” boards for the center pieces of the deck
- (5) 1x4x25” boards for the adjustable backrest
- (3) 2x2x38” braces for the backrest
- (2) 2x2x9¼” Uprights for the adjustable backrest
- (1) 1x2x28” base piece for the adjustable bracket
- (2) 1x2x24” pieces for the backrest bracket rests
- Pocket Screws
- (4) 1 1/2” Brass Hinges and screws
- Sandpaper
- Polyurethane coating
Tools
- Miter, table or circular saw
- Pocket Screw Jig
- Screwdriver
- Sander and paper in varying grits
Build the frame
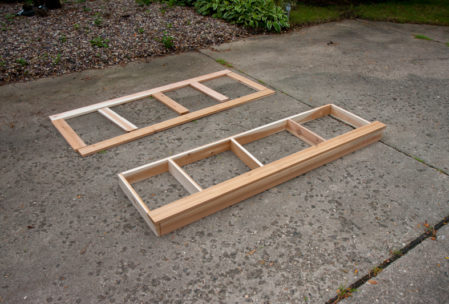
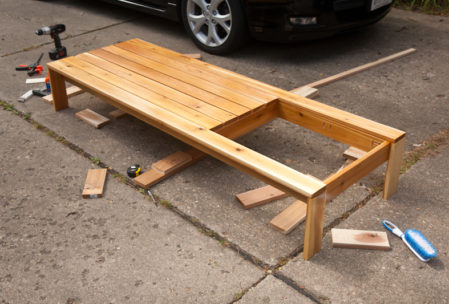
The short pieces of the frame go on the outside edges of the long pieces. Predrill holes and screw them together from the outside edge of the joint. Use the pocket jig to mount the crossmembers inside the box. The cross piece closest to the top end of the chair needs to be mounted 23 ½” from the end piece of the frame. This is the area where the braces for raising the chairback will go. The remaining two cross pieces should be mounted at 15 ¾” intervals.
Build the deck
It seems a little counter-intuitive to build the deck next. Usually the decking is one of the last things we mount on a project. But in this case, it actually helps form the framework. Using the pocket jig, screw the outermost boards (the two long ones) to the top edges of the frame with a pocket screw every 6 inches or so. Now put the short decking boards in place, mounting them from underneath with pocket screws as well. Before you mount these boards, carefully measure your exact available space and allow an equal amount of space between each board. This is a deck chair so you don’t want the board edges to be flush.
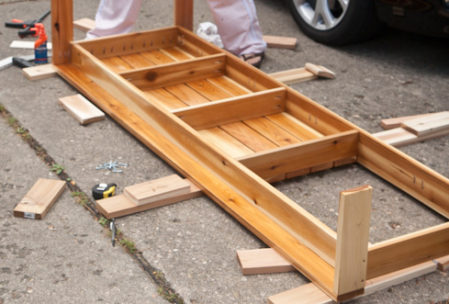
Now, you can mount the legs on the corners. I suggest a couple of pocket screws into the bottom of that edge board, and a couple of screws into the framing box as well.
Build the backrest
Mount the five 25” backrest pieces to the 2×2’s, maintaining the exact spacing you created on your deck boards. You want these pieces to look like a continuation of the deck boards when the backrest is laid flat.
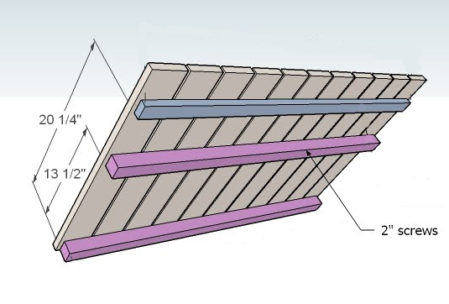
The bottom 2×2 brace should be flush with the bottom of these boards because the hinges are going to get mounted on it. Mount the center brace about 13 ½” up from the bottom, and the top brace 20 ¼” from the bottom. Make sure this is all perfectly square because it has to fit into the deck when it is lowered.
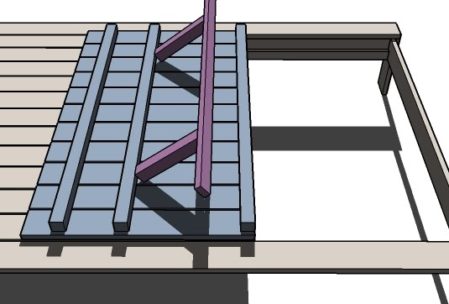
Mount the hinges for the upright brackets 8 inches in from each side of the center backrest brace. Then mount the uprights to the hinges. Screw the 1×2 base piece to the bottoms of the uprights.
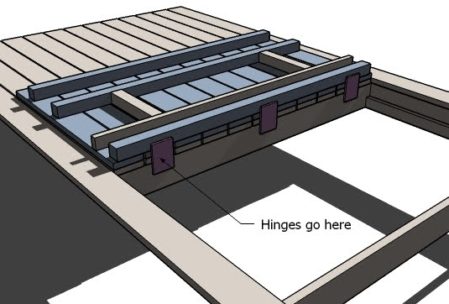
Now mount the backrest screws to the frame and backrest.
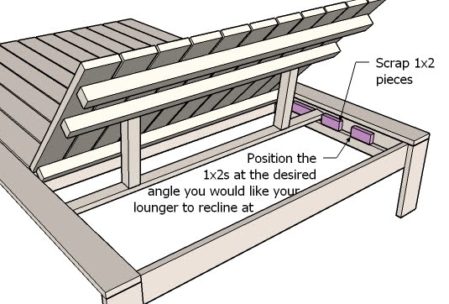
On the inside of each frame, mount the 1x2x24” pieces along the very bottom edge. The backrest brace will sit on the top of the ridge created by these pieces. Now position two or three 1x2x2 blocks from your scrap pieces along this ridge to act as stops for the backrest. The location is up to you, depending upon the positions you want to be able to set the backrest.
Finish
Sand the devil out of everything and give it three or four good coats of polyurethane for optimum waterproofing. In fact, you might consider actually doing this after you cut all of the pieces, but before assembly. That way you can be sure to get a good coating on all sides of the boards.
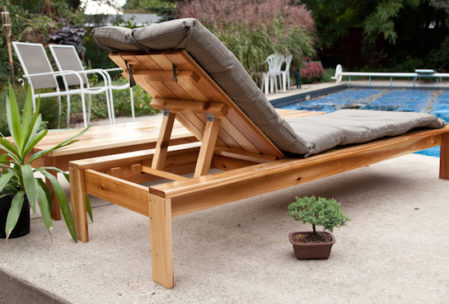
You can use the lounge chair just as it is, or find some cushions to put on it. That’s a decorating call I leave up to you.
Conclusion
These pieces exist thanks to George Nelson’s elevation of simple lines and functionality into the artform of Modernism. By definition, it’s a style of furniture that will always have a modern look to it. It’s simply beautiful.
There you have it. I’ve given you three Free DIY Furniture Plans that You Can Build Today. Well, okay, it’s going to take more than just today to finish them. But there’s no reason you can’t make the run to the lumber yard right now, and get started on them this afternoon.
For more great woodworking furniture plans visit JoineryPlans.com.
