
There are 2 kinds of woodworkers. Those who freely admit the mistakes they make, and those who try to hide the fact that they make mistakes. I can confidently say that I have never built anything without making a few mistakes along the way. It is a natural progression for any woodworker that as soon as he or she finishes a project, the next one needs to be a little tougher. Satisfaction comes from overcoming adversity.
Of course, no one wants to make mistakes. It’s better to learn from someone else’s boo-boos so that we can avoid them. That’s what this post is all about. I’m going to define my list of the 5 common mistakes made by beginner woodworkers in the hopes that I can help you avoid these, and go on to make even bigger mistakes all on your own. Hey, I didn’t promise to make you a perfect woodworker – just to avoid some common traps.
#1 – SAFETY
I know this doesn’t seem like the kind of topic you were expecting me to talk about, but I honestly can’t think of anything more important in my shop than staying safe. We are using razor sharp objects being rotated at high rates of speed that can do permanent damage to human body parts faster than you can say “Ouch!”

I love my father. He’s a wonderful man who taught me a great deal about, among many other things, woodworking. At a young age, he instilled in me the honor and satisfaction that comes from building beautifully crafted pieces of wood furniture. My life-long passion for woodworking was gifted to me at a very young age.
What he wasn’t very good at was staying safe in the shop. I have no recollection of using safety glasses. I also recall him removing guards and other safety devices from power tools because they would get in the way. That’s why a band saw once removed the tips of a couple of his fingers. To this day, this wonderful man of 84 years continues to find joy in his woodworking hobby. But I cringe every time I watch him get his fingers too close to the blade.
Jeez, dad, use a push stick!
#2 – MEASURE – THEN MEASURE AGAIN
“I sawed this board off three times, and it’s still too short.” Let that sink in before you read any further.
Nothing can ruin your day, and that beautiful piece of Cherry, quite like being so certain of your measurement…only to find out that after the cut, it’s coming up short. Measuring, marking and cutting a piece of wood seems so fundamental. And it is. It’s also very tricky.
The lines on your tape measure have a thickness to them. Your pencil line on the wood has a thickness to it. The blade of your saw has its own thickness. If you err on the wrong side of those three lines, your cut could be off by as much as a quarter of an inch.

Precise cuts require precise measurements. When you use your tape measure, don’t just look at the line. Look at which side of the line your measurement falls on. Make your pencil mark so that the same point falls on the same side of the line. Measure it again. Then make your cut so that the point is still there after your saw passes by.
Until you get the hang of these precise measuring techniques, play it safe. Intentionally cut your pieces a little long. If you have to trim them two or three times to get the measurements perfect, so what?
#3 – Haste Makes Waste
Finishing a fine piece of woodworking may be one of life’s greatest pleasures. But, just like aging a fine wine or bourbon takes patience, you can’t rush to perfection. Exercise care in every step of a project. Don’t just let a mismatched corner or other imperfection slide, thinking you’ll just fix it with sandpaper later on. Get out the hand plane and fix it. Now. You’ll thank yourself later.

#4 – Not All Tools Are Created Equal
Yes, the quality of your tools matters. Whether it’s a simple screwdriver or a dual-bevel sliding compound miter saw with laser guide, choose your tools wisely. That doesn’t mean you have to buy the most expensive tool on the market (although they usually are the best), just the best one for your needs.

That tool is going to be with you for years, and will leave its mark of quality on everything you build in your woodshop. The higher quality your tools are, the more high-quality projects you will be able to turn out. Spending a little more for a better tool is almost always money well spent.
#5 – Begin Your Woodworking Career at the Beginning
Don’t even think about building a house if this is the first time you have ever picked up a hammer. Woodworking is an art form that builds upon acquired knowledge to create ever-increasingly beautiful works.
So, start small and work your way up. It’s not really a steep learning curve, but you do have to start at the bottom of the hill. Pick simple projects (there are plenty of them scattered around the articles on this website) and learn to do them right. If you have to build a simple wine rack two or three times before you get it right, so what? That’s far less painful than spending $500 on a bunch of hardwood and ending up with nothing but a pile of scraps. See point #3 – there’s no hurry.
Conclusion
You might have thought that this article was going to be about specific types techniques or mistakes made while building something. Frankly, I did too. But as I thought about it, I realized that the mistakes made by most beginner woodworkers really have more to do with how they approach the hobby, than the actual work they do. Avoiding mistakes is as much about attitude as aptitude.
If you have your head in the right place, your hands will follow.
P.S. If you interested in more getting started with woodworking tips, make sure to check out “3 Easy Woodworking Project Plans for Beginners” article.

“You built that yourself?” When someone says that with amazement as they look at a piece I made, it sends a shiver of pride up my spine. Nothing is more rewarding than taking a seemingly random stack of wood, a few screws and some glue, and turning it into a beautiful and long-lasting piece for your home.
The skills needed to build simple wood projects from raw materials aren’t difficult. But it can be daunting if you don’t know where to begin. Fortunately, you have come to the right place. Even if you’ve never done it before, I’m giving you 3 easy woodworking project plans for beginners. We’re going to start out very simply for the first project. Then expand on the skills you learned, and add to them for our second creation. And finally, the third project will elevate the complexity. By the time you have finished all 3 of these beginner woodworking projects, you will be ready to build just about anything.
Gravity-Defying Wine Rack
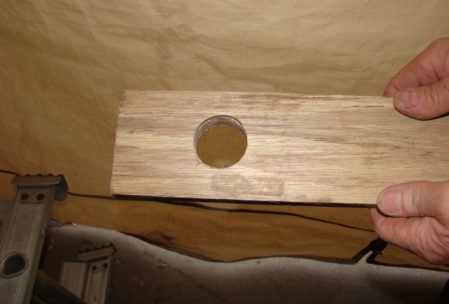
This is literally one piece of wood, with a hole in it for the neck of the wine bottle to stick through. The bottle will simply float in a mind-warping horizontal pose that just can’t be true. But it is. The secret to this balancing act lies entirely in the angle you will cut at the base of the wood.
This is one of the best simple wood projects to learn from, because it will teach you 3 basic skills. You will first measure very accurately. Then you will saw the angle. Finally, you will drill the hole. Once you conquer those 3 skills, you’re off and running.
Supplies and Tools
A 15”x 31⁄8” x ¾” hardwood board of your choice. Think oak, maple, cherry, or even redwood.
Paint or stain, whichever you prefer.
Tape Measure
Pencil
Straight Edge
Miter saw
Drill with 1 ½” wood bit
Medium and fine grit sandpaper
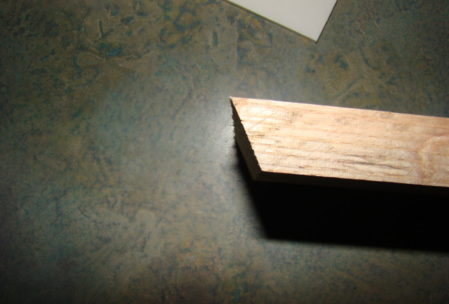
Cutting the Base Edge
The 27° angle of this edge is the whole reason this wine rack works, so it must be cut perfectly. As my high school woodworking teacher Mr. Hauke relentlessly drilled into me, “Measure twice, cut once.” So, be sure you have these measurements exact before you pick up the saw.
From the top end of the board, measure down exactly 14 1⁄8 “ and draw a straight line across the face of your board.
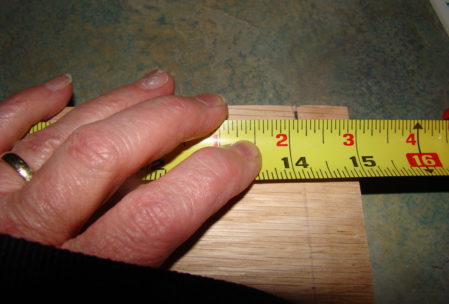
Flip the board over, and draw a line at 13 ¾”.
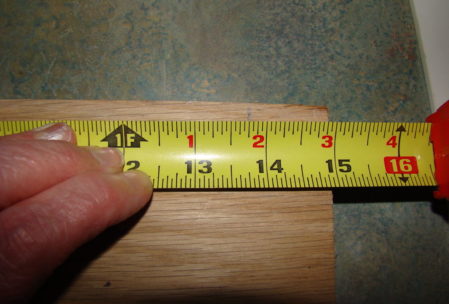
Now turn the board on edge and connect the two lines. If your measurements are exact, this line will be that 27° angle we’re looking for. To make Mr. Hauke happy, measure it again.
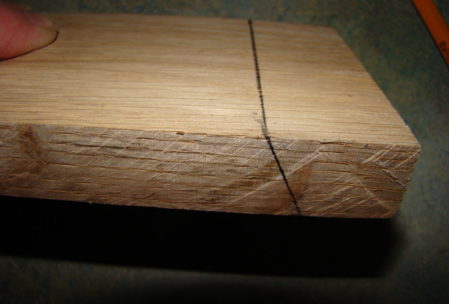
Using your miter saw (this can be a hand-powered or electric model, your choice) cut along this line as exactly as you measured it.
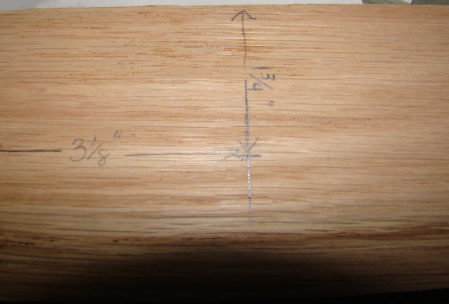
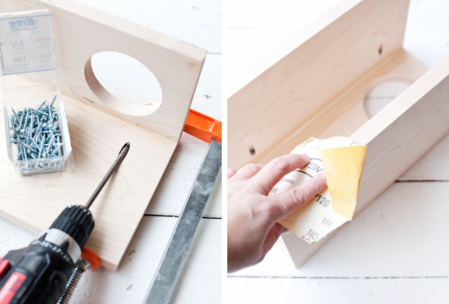
Drilling the Hole
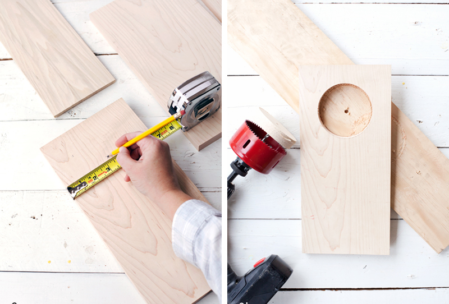
From the other end of the board (which will be the top of our wine rack) measure down 3 1⁄8” and draw a line. Find the center point of that line ( 1 5⁄8 “ if you are using a 3 1⁄8 “ board) and draw an intersecting line. The resulting X marks the spot for your drill bit.
Carefully drill the hole all the way through, generating as little splintering around the hole as possible.
Finish
Now sand the entire piece and all of the edges, first with the medium grit sandpaper, and then with the fine grit. Apply the paint or stain according to the manufacturer’s directions.
Once the finish has dried, it’s time to make magic. Place the neck of the wine bottle through the hole and set it up on that angled edge that you cut so carefully. You may have to adjust the neck of the bottle forward or back a little bit to get the balance just right. But once you do, the bottle will be suspended in space until you decide to drink it in celebration of creating the 3 easy woodworking projects.
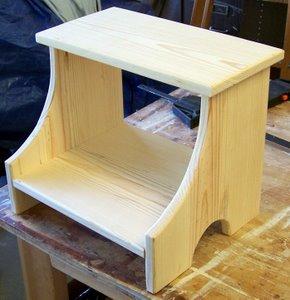
Sofa Arm Sleeve with Cup Holder
You’ve seen the sofas with built-in cupholders. It might be great on game day, but looks pretty tacky when you’re hosting a more formal affair. The next of our 3 easy wood projects gives you the best of both worlds. In fact, it’s even better than the built-in cupholders, because this one will hold a book or plate full of munchies, too.
Supplies and Tools
A 3⁄4 “ thick hardwood board cut into 3 equal lengths – we will determine the exact dimensions in our first step
A small piece of 1⁄8“ plywood – size TBD. This can usually be found at a local craft store.
Medium and fine grit sandpaper
Wood Glue (Elmer’s WoodGlue Max® is my favorite)
Wood stain
Polyurethane for water-proofing (if desired)
Tape Measure
Straight Edge
Pencil
Drill with a hole saw bit large enough to accommodate the base of your favorite beverage glass
2 clamps at least 8” long
Kreg® pocket hole kit (I’ll explain when we get to it)
Getting Started
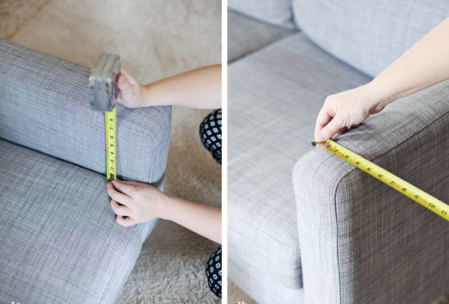
Measure the height of your sofa arm above the top of the cushion. Your board can be no wider than this measurement. The simplest thing is to go down to the next standard width of board. For example, if the sofa arm extends 8 inches above the cushion, I would go with 6” wide lumber.
A length of 14 inches will give you a long enough sleeve to accommodate both your cup and a small plate or other items. Since the top of the arm is narrower, you will have to trim the width of that piece. Measure the arm top and add 1 1⁄2” for the thickness of the side boards. For example, if the arm is 4 inches wide, the top wood piece should measure 5 1⁄2” wide.
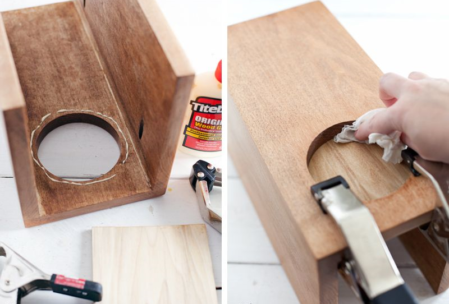
Drilling
Using the technique for finding the center of the hole that you learned while making the wine holder, mark the spot for the center of your hole saw, making sure to leave at least an inch of wood between the hole and the front edge of the board. Then carefully drill the hole.
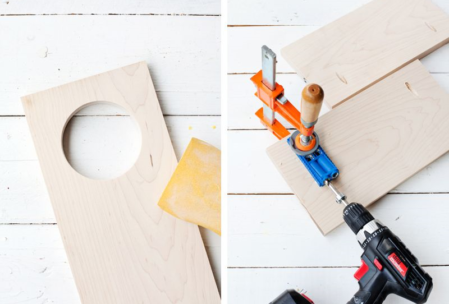
Next we’re going to use the Kreg® pocket hole drilling jig to make 2 perfectly angled holes on the inside of the side boards of our sleeve. Measure about three inches in from the ends of each board, and clamp the jig in place.

Follow the instructions with the jig to drill these holes, which will only be seen from the inside of the sleeve. The jig is an ingenious device that gives easy wood projects a very professional look. But practice on a piece of scrapwood first to make sure you have it down. Learn more about the Kreg Jig R3 here.
Put it all together
Spread a very thin layer of glue on the edge of one board that has the pocket holes drilled in it. Clamp the piece in place against the top board, being certain that all of your edges line up perfectly and the pocket holes are facing the inside. Be sure to immediately wipe away any glue that squeezes out of the seam. Glue residue will ruin your stain job. Now insert the pocket screws and allow the glue to dry. Then, glue, clamp and screw the other side in place. Once the sides are in place, give the edges a good sanding to round them a bit. That way they won’t snag on the sofa covering.
Glue a small piece of thin plywood to the underside of the cup hole, clamping it in place and again being careful to quickly wipe away excess glue.
Sand the entire piece as smooth as possible, and apply your stain. If you want it to be waterproof, apply a finishing coat of polyurethane.
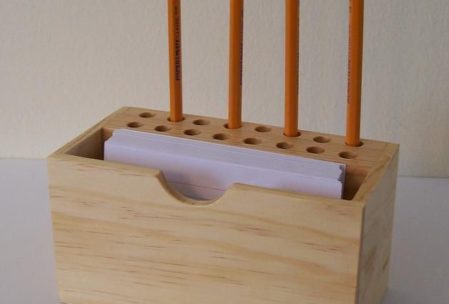
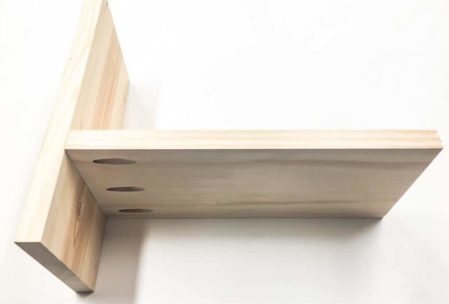
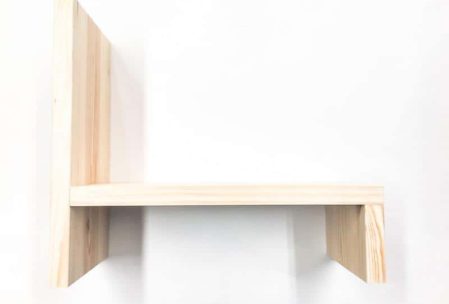
Adjustable Desktop Organizer
I’m going to finish this list of 3 Easy Woodworking Project Plans for Beginners with a project that, if you built the first two beginner woodworking projects, you already know how to build. But it will help elevate your skills to a new level.
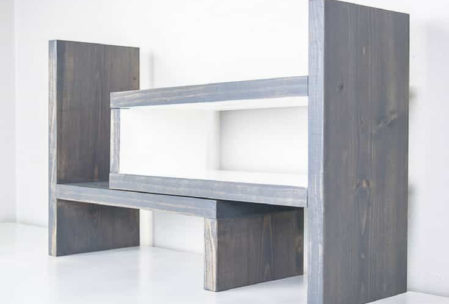
This is a desktop organizer than can be arranged in a variety of ways. It can be set up straight, or on a corner.
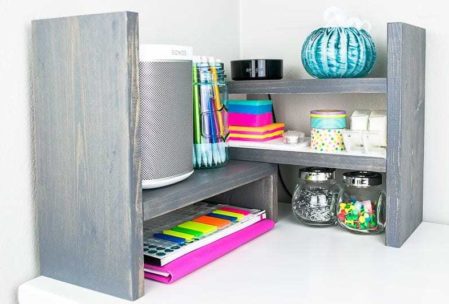
The length can be varied by pushing two pieces together, or sliding them wider apart. The concept can also be scaled up or down by using different sized lumber. For demonstration purposes, we’re going with 6-inch wide lumber.
Supplies and Tools
1x6x6 foot hardwood board (which is really 3⁄4” thick)
Pocket Hole Screws
Wood Glue
1 ½” brad nails
Medium and Fine grit sandpaper
Saw
Drill
2 clamps at least 8” long
Kreg® Pocket Hole Jig
Prepping the lumber
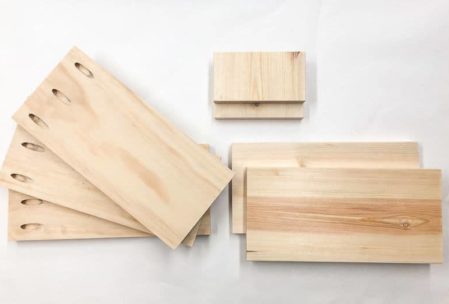
Cut the board into three 12” long pieces, two 11 1⁄4” pieces, and two 3” pieces.
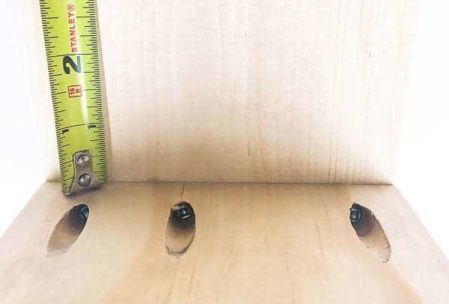
Drill three pocket holes into one end on each of the three 12” pieces. These will form the shelves.
Putting it together
Measure three inches from the bottom edge of one of the 11 1⁄4” pieces, and draw a line. Lay a thin film of glue along the pocket screw end of a board. Place the bottom edge of this board above the line and insert the pocket screws.
Place glue on the top edge of a 3” piece, and clamp it in place under the other end of the shelf board. Clamp it and secure with brad nails (or 1 1/2” wood screws, if you prefer).
Using the same glue and screw technique, attach another shelf to the other 11 1⁄4” piece exactly 3 3⁄4“ up from the bottom, and the third shelf exactly 3” above the top of the first shelf.
Secure the remaining 3” piece between the open end of those 2 shelves. Glue, clamp and secure with brad nails.

Sand and finish the same way you did for the other 2 easy wood projects.

Congratulations!
You did it! You completed our 3 Easy Woodworking Project Plans for Beginners. These are very easy woodworking projects to help you get your feet wet. Or should I say, to get them covered in sawdust? And while these may be very simple wood projects, their real value is in helping you learn some of the most important basic skills you need to be ready to build anything. Make sure to check out also The 5 First Steps To Get Started With Woodworking article.

How do you take your woodworking to a new level? Usually you need more equipment, right? And a router table is coveted by many aspiring woodworkers. But why waste money buying one if you can simply follow the complete guide for building a router table?
Even basic woodworking skills are enough to manufacture this quality working area. Then you can save time and improve the quality of your work. Get your tools ready and transform your hobby overnight.
Points to Consider
Why are you making a router table? Your answer determines what kind of table you should consider:
- If you need more general workspace you should make a large router table. You can simply unscrew your router to have a smooth work surface you can use in future.
- What you create also determines the router table size. Your beginner woodworking projects may evolve into making large items. Don’t limit your work by having too little space to work on.
What are your needs and priorities? Customize the plan below to suit them so your router table is as practical as possible.
Step 1: Get Your Tools
You’ll use many skills in this project, which also require different tools:
- The router itself. If you still need to buy one, there’s no right or wrong. Simply try to match the size to the type of beginner woodworking projects your love, as well as the space you have available.
- Wood for the router top. Plywood or Pine is ideal.
- Plastic or Perspex for your face plate.
- A long piece of wood for your router fence.
- Screwdrivers
- Screws
- Glue
- A saw
- Drill bits
- Jigsaw
- Chisel
- Router mounting bolts
- A sander
Ready to get started? This video shows many skills you’ll use while following this guide.
Step 2: Design Your Base
Your router top needs a sturdy framework to support it and the weight of your future woodworking projects. You also need to lift your top off the floor to create the space for the router that will be fixed to the bottom.
A simple option is building a framework from maple wood and planks:
- Pick a height you can comfortably work at
- Cut one leg according to this height
- Cut three additional legs
- Clamp them together
- Are they the exact same length? Saw off any pieces that could make your table unstable
- Build two squares, each from four pieces of ½” planks:
One that will fit on the outside of the legs
One that fits on the inside of the legs - Glue and screw the larger one in place so the legs are flush with its top
- Screw the smaller one in place 8” above the floor

This unit can provide valuable storage space. Add side panels, a bottom and a door to form a cabinet if you want. Don’t add shelves before measuring out the space the router will take up.
Step 3: Create Your Top
Once your foundation is ready, it’s time for your top.
Make Your Wooden Top
Your top will be made of a large piece of wood. Depending on your router’s size, practical dimensions are 3’x4’.
Here’s what you do:
- In the center of the piece of wood, measure a square slightly bigger than the router head
- Draw another square 1” bigger than this square around it
- Cut out the inner square entirely
- Cut a rabbet with a chisel using the bigger square as your guide

Your Perspex face plate will rest on this rabbet.
Add a Perspex Face Plate to Work Easier
Perspex allows you to view your router, giving you more control. If anything malfunctions you’ll notice it and you can make adjustments easier when you have your eye on the lever.
This is much better than getting on all fours to make proper adjustments from underneath your router table. As you progress from beginner woodworking projects to more advanced ones, time becomes an important factor. These small details in your workshop layout help you complete jobs faster.
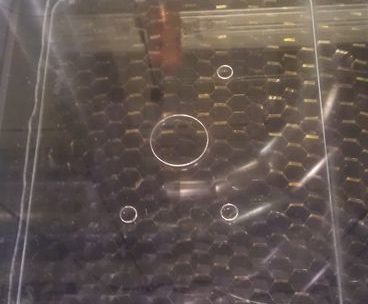
Creating Your Face Plate
- Measure the size of your large square (that you drew on the wood) on Perspex and cut it to size.
- Take off your handheld router’s base plate.
- Drill a hole through the center which the router bit can fit through
- Lay the Perspex flat, but over the edge of your work table
- Place the router bit through the hole
- Mark the positions of the screw openings
- Drill holes for these screws in your Perspex plate
- Mark the position of the router adjustment lever and drill a hole
Can you see how stylish your router table will be?
Step 4: Let’s Construct a Fence
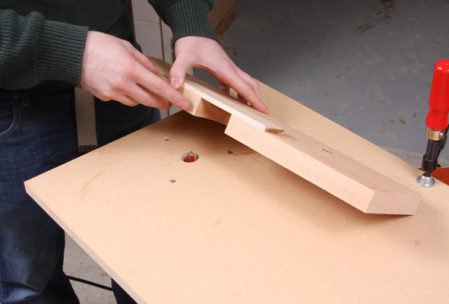
This part is easy. A fence is simply a long piece of wood you use as guide when pushing projects across your router table.
In general a 32” long plywood piece is sufficient. Cut a half circle hole where the fence will meet the router head. Screw a narrow piece of wood over this half circle for safety. Now nothing can accidentally fall onto the router bit or down the hole.
Your fence can be fixed to the top using:
- A pivot knob
- A clamp
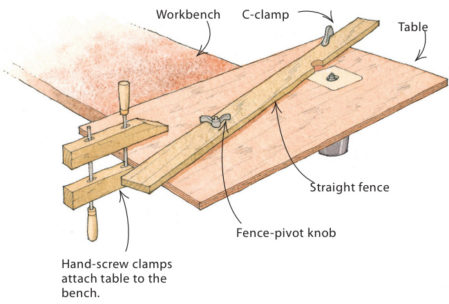
Both of these clamp the fence to the table. You can easily loosen the knob and adjust the position according to your project’s requirements.
It’s wise to make more than one fence. Narrow fences are ideal when working with small parts. If you need more support working with large pieces of wood, a higher fence ensures the wood doesn’t accidentally flip over.
Step 5: Fitting Everything Together
You’ve created everything you need to build your router table. Assembly is easy:
- Place your wooden top on your cabinet or frame
- Screw it in place to ensure stability
- Place the Perspex face plate inside its crevice
- Position the router underneath the Perspex and push the router bit through
- Insert and tighten the router mounting bits to hold it in place
It should look something like this:
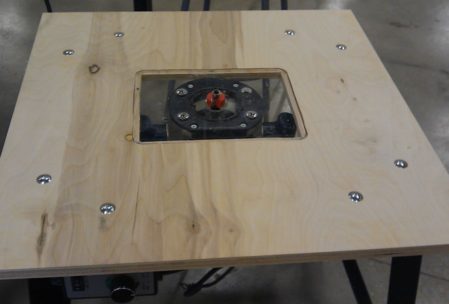
Now you can simply clamp your fence to the wooden top
Easy assembly also means it’s easy to take apart. If you need to store your router or the table, you simply unscrew the parts. Take it out again when you need the table for other projects.
Step 6: Finishing Touches—Make it Look as Good as it Works
Your final touches are about aesthetics and practicality. Prevent getting hurt by sanding away any rough edges or splinters.
That’s all it takes! You just created a new router table so you can attempt even more intricate woodworking projects in future. Ready for another one?

It’s the perfect gift for almost any lady. A jewellery box. Now add the fact that it’s made by a loved one. The box itself is the valued item now. And you can do this for your loved ones with this free step by step plan for building wooden jewellery box. We promise, it’s not as difficult as you think.
Step 1: Pick the Perfect Style
This is one of those exciting small woodworking projects you can easily customize to make it extra special for you or the one you gift it too. What are your preferences?
Wood Type
You must pick a type of wood to work with. Think of colors that fit your room’s décor or someone’s personality. We advise you work with:
- Oak
- Mahogany
Size
Because building wooden jewelry boxes are simple you can adjust the size to the requirements. Below we use a set of measurements that are appropriate for most people’s uses. But customize them to suit the available space or number of jewellery pieces it must contain.
Step 2: Plan and Prepare Well for Small Woodworking Projects
Never start small woodworking projects if you haven’t assembled all necessary tools and resources. If you’re only starting out with this hobby, the article Top 7 Essential Woodworking Tools for Beginner Carpenters will help you prepare. Don’t be tempted to skip this step. Stopping in the middle of your project wastes time and looking for a tool takes away your focus. What if you forget an important step and your project is ruined? Proper planning prevents mistakes.
Here are the basic items you’ll need for this DIY project:
- Tape measure
- Selected wood
- A saw
- Sander
- Try square
- Screws
- Glue
- Biscuits to join pieces together
- Wood finish
- Rope or tubing
Are you ready for this?
Step 3: The Creative Process Starts – Creating Your Panels
Let’s make it easy if you’re a beginner. Here are sizes that work:
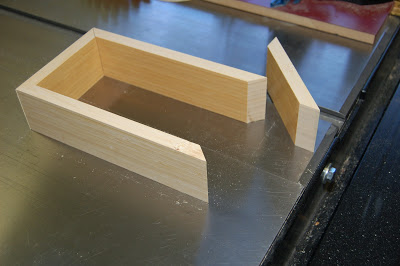
- The sides and lid should all be ½” thick. This is easy to work with and won’t make the box too heavy.
- Cut your wood panels to these sizes:
o The lid: 7.88”x10.25”
o Front and back panels: 2.5”x10”
o Two sides: 2.5”x7.63” - The bottom doesn’t have to be from oak or mahogany. Use plywood and cut it to size: 7.06”x9.44”
You create these pieces by:
- Sanding and planing the wood to the correct thickness.
- Cutting wood to size.
- Leaving wood for a few days to acclimate and distort. You don’t want this to happen after the box is assembled.
You also need the following preparations for assembly:
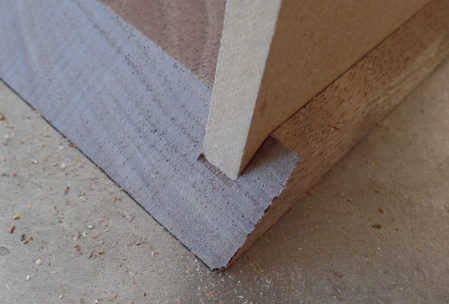
- Cut miters with a blade or saw. Read here if you’re unsure how to get this exactly right.
- You need biscuit slots in each miter
- All the sides require grooves on the inside where the plywood bottom can slide into. The grooves’ positioning depends on how shallow the box must be.
Step 4: It’s Coming Together—Assemble Your Parts
Now it’s time to see your creation come together!
Follow this advice step by step or one of your panels won’t fit:
- Put glue on miters and slots
- Place biscuits into slots
- Use these features to assemble three of the four sides
- Slide the bottom into place
- Add the fourth side
Now your construction must stay in place until the glue is dry. Push the panels together by tightly binding rope around the square. Plastic tubing is also an option.
Wait until it’s dry and sand it down to remove rough edges and leftover glue.
Step 5: Make the Lid User Friendly
Even with this simple jewellery box you have options to customize it and give it character. How do you want the box to close?
- Keep the lid separate from the base so you can put it aside while you rummage through its contents.
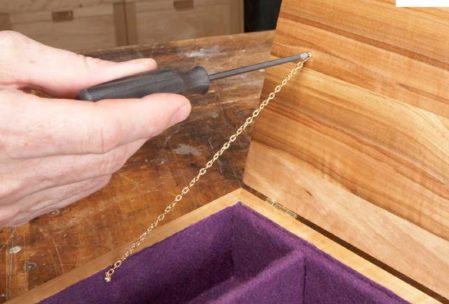
- Connect the lid to the base with hinges. In this case it’s ideal to add a chain on the inside too. It keeps the lid from wearing out the hinges or clamping down on your fingers while holding it:
o The hinges must allow the lid to lean backwards past vertical so it doesn’t snap shut
o The chain must be the right length to keep the lid from falling backwards completely
o Fix the chain to screws on the inside of box so it falls inside when the lid is closed
Step 6: Add the X Factor
You want your jewellery box to look as stylish as the jewels inside, right? That’s why the finishing touches are important.
Keep it Classic on the Outside
Wood has timeless aesthetic value. That’s why a wooden jewellery box is always a stylish gift. You can decorate it, but a simple wood finish is usually the best answer.
Test the finish on a leftover piece of wood to ensure it’s the shade you want. One layer is enough. The more coats you add the darker the wood will become. Add thin coats with a brush so they can dry easily.
Tip: If this box is meant as a present you need to plan ahead. Any stain or finish will give off some residue at first. Allow for enough time that the box can stand and dry completely before gifting it. You don’t want your friend’s hands stained, right?
Add Flair to the Inside
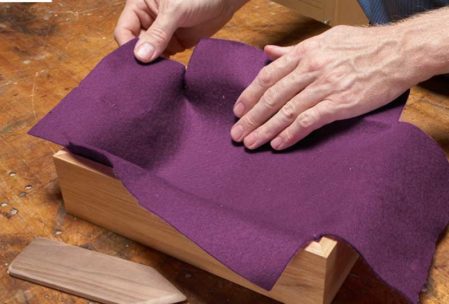
A felt interior is beautiful and practical because the pieces won’t easily roll around or get damaged.
Do it step by step and this won’t get messy:
- Place glue on the bottom first.
- Spread glue—very thinly—directly on the wood.
- Cut a piece of felt big enough to cover bottom and sides. Add notches so the felt will easily bend upwards.
- Place felt on the glue and press down hard. Smooth out all creases.
- Now spread glue on sides.
- Press felt onto sides.
- Cut away excess felt
Add another feature for even more diversity: Dividers.
Cut dividers to size out of plywood and cover them with felt. They can be the length or width of the box. Now they can slide into place and even be moved depending on the owner’s requirements.
Don’t Forget the Bottom
Show the owner of the jewellery box that you thought of everything. Glue small felt squares to the bottom. This prevents slipping and scratching of smooth surfaces.
Voila! You’ve done it. Following a step by step guide shows you what you’re capable of. Building wooden jewellery boxes is only the beginning. What other small woodworking projects will you attempt next?