
How do you take your woodworking to a new level? Usually you need more equipment, right? And a router table is coveted by many aspiring woodworkers. But why waste money buying one if you can simply follow the complete guide for building a router table?
Even basic woodworking skills are enough to manufacture this quality working area. Then you can save time and improve the quality of your work. Get your tools ready and transform your hobby overnight.
Points to Consider
Why are you making a router table? Your answer determines what kind of table you should consider:
- If you need more general workspace you should make a large router table. You can simply unscrew your router to have a smooth work surface you can use in future.
- What you create also determines the router table size. Your beginner woodworking projects may evolve into making large items. Don’t limit your work by having too little space to work on.
What are your needs and priorities? Customize the plan below to suit them so your router table is as practical as possible.
Step 1: Get Your Tools
You’ll use many skills in this project, which also require different tools:
- The router itself. If you still need to buy one, there’s no right or wrong. Simply try to match the size to the type of beginner woodworking projects your love, as well as the space you have available.
- Wood for the router top. Plywood or Pine is ideal.
- Plastic or Perspex for your face plate.
- A long piece of wood for your router fence.
- Screwdrivers
- Screws
- Glue
- A saw
- Drill bits
- Jigsaw
- Chisel
- Router mounting bolts
- A sander
Ready to get started? This video shows many skills you’ll use while following this guide.
Step 2: Design Your Base
Your router top needs a sturdy framework to support it and the weight of your future woodworking projects. You also need to lift your top off the floor to create the space for the router that will be fixed to the bottom.
A simple option is building a framework from maple wood and planks:
- Pick a height you can comfortably work at
- Cut one leg according to this height
- Cut three additional legs
- Clamp them together
- Are they the exact same length? Saw off any pieces that could make your table unstable
- Build two squares, each from four pieces of ½” planks:
One that will fit on the outside of the legs
One that fits on the inside of the legs - Glue and screw the larger one in place so the legs are flush with its top
- Screw the smaller one in place 8” above the floor

This unit can provide valuable storage space. Add side panels, a bottom and a door to form a cabinet if you want. Don’t add shelves before measuring out the space the router will take up.
Step 3: Create Your Top
Once your foundation is ready, it’s time for your top.
Make Your Wooden Top
Your top will be made of a large piece of wood. Depending on your router’s size, practical dimensions are 3’x4’.
Here’s what you do:
- In the center of the piece of wood, measure a square slightly bigger than the router head
- Draw another square 1” bigger than this square around it
- Cut out the inner square entirely
- Cut a rabbet with a chisel using the bigger square as your guide

Your Perspex face plate will rest on this rabbet.
Add a Perspex Face Plate to Work Easier
Perspex allows you to view your router, giving you more control. If anything malfunctions you’ll notice it and you can make adjustments easier when you have your eye on the lever.
This is much better than getting on all fours to make proper adjustments from underneath your router table. As you progress from beginner woodworking projects to more advanced ones, time becomes an important factor. These small details in your workshop layout help you complete jobs faster.
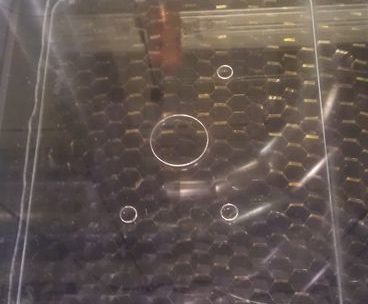
Creating Your Face Plate
- Measure the size of your large square (that you drew on the wood) on Perspex and cut it to size.
- Take off your handheld router’s base plate.
- Drill a hole through the center which the router bit can fit through
- Lay the Perspex flat, but over the edge of your work table
- Place the router bit through the hole
- Mark the positions of the screw openings
- Drill holes for these screws in your Perspex plate
- Mark the position of the router adjustment lever and drill a hole
Can you see how stylish your router table will be?
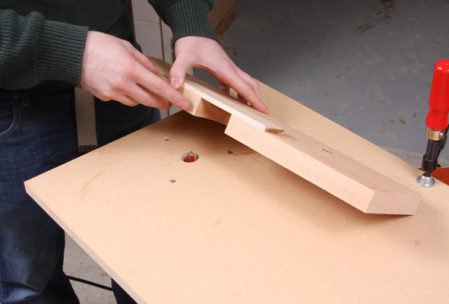
Step 4: Let’s Construct a Fence
This part is easy. A fence is simply a long piece of wood you use as guide when pushing projects across your router table.
In general a 32” long plywood piece is sufficient. Cut a half circle hole where the fence will meet the router head. Screw a narrow piece of wood over this half circle for safety. Now nothing can accidentally fall onto the router bit or down the hole.
Your fence can be fixed to the top using:
- A pivot knob
- A clamp
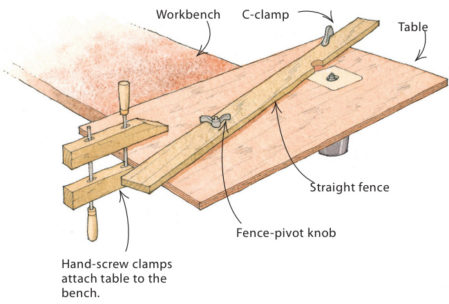
Both of these clamp the fence to the table. You can easily loosen the knob and adjust the position according to your project’s requirements.
It’s wise to make more than one fence. Narrow fences are ideal when working with small parts. If you need more support working with large pieces of wood, a higher fence ensures the wood doesn’t accidentally flip over.
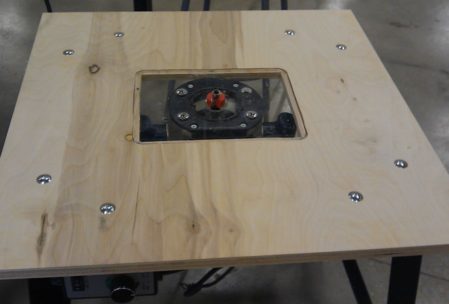
Step 5: Fitting Everything Together
You’ve created everything you need to build your router table. Assembly is easy:
- Place your wooden top on your cabinet or frame
- Screw it in place to ensure stability
- Place the Perspex face plate inside its crevice
- Position the router underneath the Perspex and push the router bit through
- Insert and tighten the router mounting bits to hold it in place
It should look something like this:
Now you can simply clamp your fence to the wooden top
Easy assembly also means it’s easy to take apart. If you need to store your router or the table, you simply unscrew the parts. Take it out again when you need the table for other projects.
Step 6: Finishing Touches—Make it Look as Good as it Works
Your final touches are about aesthetics and practicality. Prevent getting hurt by sanding away any rough edges or splinters.
That’s all it takes! You just created a new router table so you can attempt even more intricate woodworking projects in future. Ready for another one?