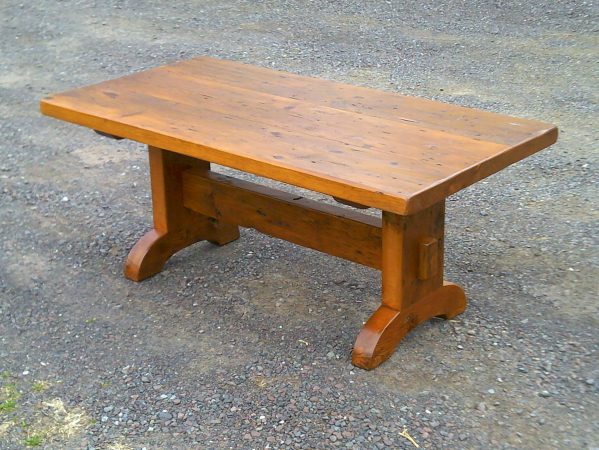
Furniture designers have been playing around with the idea of knockdown furniture for centuries. The greatest appeal has always been that it allowed people without advanced tools to put together practical furniture with simplicity, such as the ever-popular trestle table. So why not try the same approach for some easy wood coffee table plans in just three simple steps?
Why a Wood Coffee Table?
There’s a reason why they say the classics are the best: we’ve drawn up a great wooden coffee table plan that will fit into any house looking for that rustic, burgundy aesthetic. With nothing more than bit of elbow grease and some light hand tools, you can construct your own wooden coffee table from ordinary one-inch common pine today.
Before you get started, remember: like always, be careful when you pick your wood, especially because the table will be clear-finished and stained. Essentially, you will want to find pieces with no bows or bends, and a few more than you necessarily need just in case you run into knots or other problems.

Step 1: The Top
Crosscut five 1 x 6 boards with a circular saw, but remember that each board should have a little extra length. Afterwards, with a straight strip to help, use a hand plane to join the edges after tearing the boards with too much width.
Next, sort the boards you have in a pattern where their annual rings of adjacent boards are on opposite ends; then on the plate-joint centers, place a mark. With a joiner and the work on a flat and safe surface, begin to cut the plate slots. Remember—it is important to align the upper surfaces of your boards, so make sure to keep each board facing down.
With glue in the slots, it’s time to put together the tabletop and slide in the plates. Then with pipe clamps, lock in the table top. You may find yourself having trouble with a buckling top, so be sure to clamp 2 x 4 pieces with waxed paper beneath them beneath the boards. The waxed paper stops them from sticking to the glue on the top. Scrape off the extra glue after it has dried with a paint scraper, and then with a cabinet scraper, start smoothing out the joints. With a belt sander, pad sander, and or/random-orbit, even out the rest of the surface. When everything is done, you can now to the specified width and length.
It’s now time to focus on each corner where you will cut the radius. To do this, use your sabre saw with a circle-cutting guide, and set a three-inch pivot point on the bottom of the top from every edge. Make the cuts, rout the chamfer around the tabletop’s lower edge, and then smooth out the top.
Step 2: The Beam
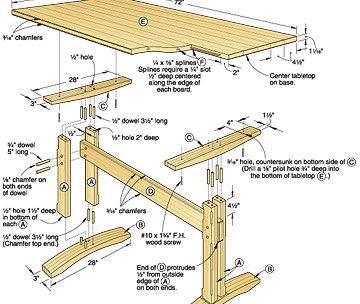
First thing’s first: Cut two 48 inch lengths of 1 x4 stock so that you can build the trestle beam, which should be 1.5 inches thick. To set alignment holes between the boards, nail them together temporarily. Now you have to establish the mortise locations, which you will do with a square and rule. Afterwards, pull apart the boards and pull the lines to the workpieces’ mating faces.
Now you have to focus on creating the beam tenons. Firstly, on the workpieces’ ends, place the shoulder cuts. Use a clamp to clamp together a pair of 3/4 x 1 1/2 x 14-inch boards, creating a strong and wide foundation for your router with each beam face at either end. Add about an extra half inch to the tenon’s length with guide strips with your cardboard spacer.
Now you can do the cut after the strips have been tacked to the beam. Do the process again with broad cheek tenon cuts after the bottom and top shoulder cuts have been finished. Stick pieces of 1 x4 stock together to make the feet and leg blanks. Ready the pieces that are longer than the specified length and hammer some nails in the extra area at each end, keeping the pieces from moving as you glue and clamp them. After the glue has dried, begin to plane the edges.
Step 3: Legs
At both ends of each mortise, drill in ¾ inch holes, then with a sabre saw, smooth out the rest of the waste. At the end of the beam tenon, remove a slice of cross-section. Place this on the outline of the leg mortise and then create a template frame around it with plywood strips. In your router, install a template bit; make sure that above the cutting edges there is a pilot bearing. Align the plywood frame with the bearing and make your first cut. After that, guide the first cut by adjusting your bit and then finish your mortise. With a chisel, smooth out the edges.
It’s time to cut to the exact length and width on the battens and feet. Make note of the positions of the leg face by marking the battens and feet blank, then make note of the pieces’ centerlines. Steady the edge and hold it in place with your foot as you use the plate joiner to slice a cut over the leg face position, about 7/16 inches above. After your first slot, cut the second slot after raising the joiner with a 5/8 inch thick shim.
In the leg ends, cut the slots. Use your joiner and stock to cut the first set of slots. For the second set, raise the joiner to 5/8 inch shim. Make sure that for the first bevel cut you make, you mark the feet ends. The cut should be made with a handsaw; afterwards, plane it until it becomes smooth. Then you must shape the sloping face bevel with your hand plane after marking it. Finally, mold the compound bevel.
Final Step: Assembly
You’re almost done with your easy wood coffee table plan. Remove any excess from the bevel ends flat and rout the chamfers. Now put together the feet, battens, and legs. Put together the table base and create your beam wedges. With a drill, make a half inch hole in all of your battens. Fill these holes with dowel centers and—after aligning the top—push to down. Secure each batten by gluing in a half inch dowel.
When your table is assembled, now you can finish it up with your Minwax Wood Conditioner. Finish the job with three coats of Minwax Clear Semi-Gloss Polycrylic Finish and a pair of coats of Minwax Colonial Maple Stain, for that real wooden look. Now you’re done with this expertly-designed furniture plan! If you liked this one, here are a few more free furniture plans you can try out. Enjoy!
