
So, you have always been interested in woodworking, but never did more than just dabbling around the edges. And now you’re ready to go for it! But where to begin? Well, for starters, you’re going to need a sturdy workbench. It literally forms the foundation upon which you will build all of your other projects. So, let’s begin our 2 Easy Woodworking Project Plans for Beginners by building our work bench, and then we’ll move on to the second of our easy wood projects that will help launch your woodworking hobby in a big way.
A Sturdy Workbench Built on the Cheap
Your bench may be the only thing you build that never leaves the shop. But the quality of everything you make can be affected by it. You use the bench to saw, hammer, screw, clamp, glue and finish everything. It is indispensable, and needs to be sturdy. Search the internet for workbench plans, and you’ll find thousands. But, in my humble opinion, most of them are lacking in one major area.
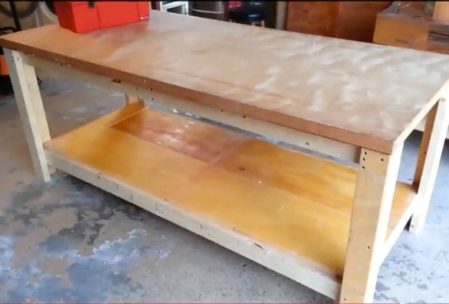
Bench plans frequently call for the work surface to be made of ½” plywood. That’s just not heavy-duty enough to provide a stable surface. Try pounding a nail through a couple of 2×4’s, and everything else on that bench will bounce around, and eventually fall on the floor. This bench plan solves the problem by using a solid-core wooden door as a sturdy work surface. Brilliant!
Tools
Miter saw (I have a 10-inch sliding miter saw – a necessity in any shop)
Drill
Screwdriver or screw gun
Hammer
Tape Measure
Carpenter’s square
Pencil
Supplies
(10) 2”x4”x8’
3” wood screws
1 ¼” inch wood screws
(6) 90° steel angle brackets
1½ inch 6D finish nails
(1 ) 36”x80” solid core wooden door. Search for this at resell stores where damaged materials are sold. For example, a Habitat for Humanity Restore. Some hardware retailers also sell damaged goods. If there are a couple of scratches in the finish, no one will want to use it as a door. But it’s perfect for a bench top.
Build the frame
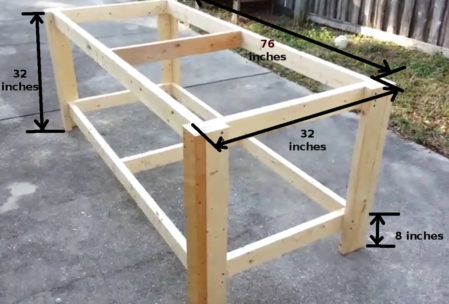
The entire frame is made of 2×4’s. Begin by sawing eight 32” long pieces that will form the upright legs. If you want a taller bench, increase this length, but be sure to increase your lumber purchase accordingly.
You want the benchtop to overhang the frame by a couple of inches, so you can use that edge for clamping. So, if the door is 36×80, make the frame 76×32. That means we need four pieces 76” long, and four pieces that are 29” (the end pieces will fit inside the dimensions of the longer ones). We also want to add a bit of strength in the center of our frame, so cut two more 29” pieces that will become joists.
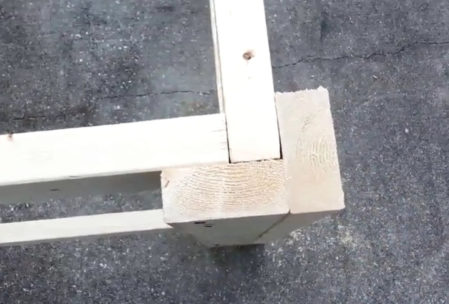
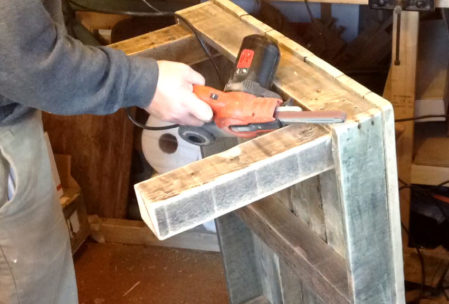
To build a leg, clamp two of the 32” pieces together in an “L” shape. Predrill holes for 4 screws placed at even intervals, and secure the pieces together with 3” wood screws. Repeat this procedure for the other 3 legs.
The frame that our door will rest on gets built on the inside of the “L” of our legs. The 76” piece gets mounted first against the short side of the “L”. Use two 2” screws for this task, predrilling all holes to avoid splitting the wood. The 29” piece then gets butted up against the longer piece, and screwed into the long side of the “L”. Be sure the frame is mounted flush with the tops of the legs. Then find the center of the longer frame dimension (38” for our example), and mount the joist piece, using the 3” screws put in from the outside of the frame.
A second frame gets built in exactly the same way, but lower down on the legs – 8 inches above the bottom. This gives the structure added strength, and also forms the frame for mounting an optional lower shelf.
Mount the top
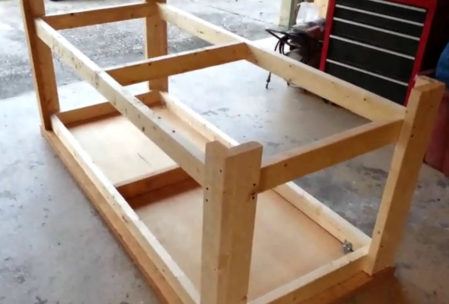
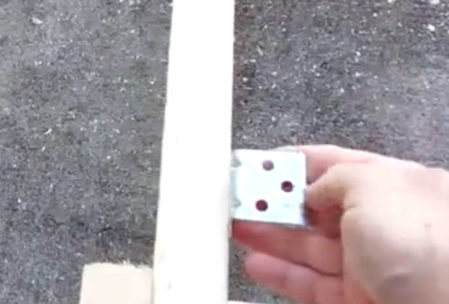
Decide which side of the solid-core door will be the working surface for your bench, and lay it on the ground with that side facing downward. Lay the frame on it, upside down. Attach the door to the frame with the eight angle brackets, two on each side, and one in the middle of each end. Use the 1 ¼” screws for this task.
Customize your bench
It’s a good idea to add a shelf on that lower framework. Use at least ¼” plywood, and I recommend 3/8” or even ½” to add some heft to your bench. Again, predrill the holes and use the 1 ¼” screws to mount it.
Additional free DIY workbench plans can be found here.
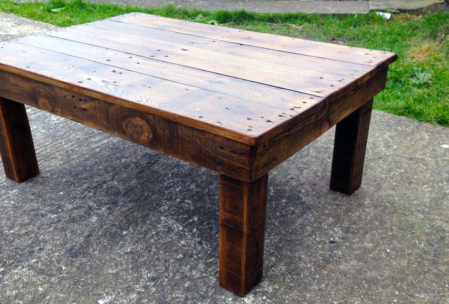
Pallet Wood Coffee Table
The second of our 2 Easy Woodworking Project Plans for Beginners uses many of the same construction concepts and techniques used to build your bench. To add a twist, here’s one of our easy wood projects that uses scrap lumber, so you can build it for almost no cost! But this is rough lumber that needs a lot of refinement. So, although this is one of our simple wood projects, it’s going to take a good dose of elbow grease for a great result.
Tools
Miter or table saw
Drill
Power sander
Hand planer
Screw Driver
Supplies
1 or 2 pallets, depending on the desired table size and the condition of the pallets
4×4 wood, preferably recycled so it matches the look of the pallet wood. 4×4’s are often used for shipping purposes and are likely available at the same place you find your pallets
1 ¼” inch wood screws
Several grades of sandpaper for the power sander
Stain (your choice)
Polyurethane
Build the frame
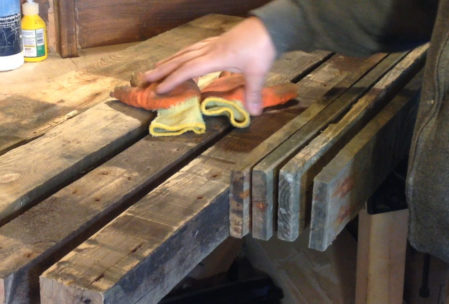
The first step in building anything from pallet wood is, obviously, to dismantle the pallet. Remove all nails and screws, and pick out the pieces you want to use. Give them a good sanding with course sandpaper. 80 grit would be a good starting point.
Just like the work bench we built, we will need 4 legs and 4 pieces of wood to form a frame. Begin by cutting the 4×4 into 4 equal length pieces. A typical height for a coffee table is 16 inches. From the pallet planks, cut two pieces 23” long, and two more 36” in length.
Screw the pieces (I used 4 screws at each end) to the outside surface of the legs so that they are flush with the leg tops. Just like the bench, we want the shorter end pieces to be mounted inside the ends of the long pieces. In other words, when you look at the table from the long side, you won’t see the joint between the frame pieces.

Then, just like the work bench, add a joist piece across the center of the long ends to add stability to the center of the table. I suggest making this out of the same 4×4 material you used for the legs, to give it added strength.
Now sand the entire frame until you just can’t anymore, working your way through progressively finer sandpaper grits. By the time you’re finished, you should be working with 240 grit paper.
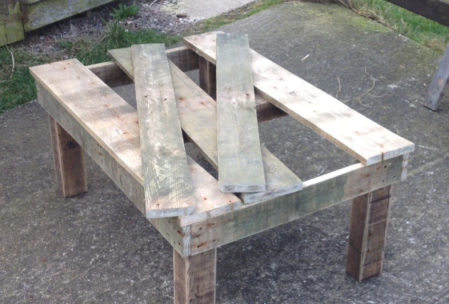
Carefully pick out your favorite pieces of plank wood from the pallets, and cut them to the proper length to cover your table. You have an option here, of either making the top fit the exact size of your frame, or having the ends hang out over the frame an inch or so, just like we did with our bench top.
Sand the devil out of these pieces, too, and make sure the edges are straight enough to give you nice, tight joints between the boards. If not, you may have to plane them a bit. Stain the entire piece, and finish with a couple of polyurethane coats for total protection.
Then, set your coffee cup on the table and sit back with a big smile on your face, knowing that you just completed one of our easy woodworking projects that cost almost nothing, but looks like a million bucks.
Conclusion
There you have it! A couple of beginner woodworking projects that you can be proud of for years to come. The first gets your shop ready to tackle these simple wood projects, and the second gives you a place to relax when your done for the day. Enjoy!