3 Small Wood Projects That You Can Build In Just Several Hours
There is something very satisfying about taking on a monster project in the wood shop. Spending hours sweating over every little detail, creating a work of art from raw wood that will likely live on long after you are but a memory. It’s a personal piece of immortality.
Then there are times where you just feel the need to make something – now. Some little project that will make me feel good in just an hour or two. Little projects carry their own kind of satisfaction, and there’s nothing wrong with that. So, today, I have 5 small projects that you can knock out in no time. Well, okay, I have a few confessions here.
First, you could argue that there are only 3 projects. But that third project involved two chairs and a table. So, if you count each piece as a project, it’s 5. Plus, if you try to build both chairs and the table all at once, it’s going to take more than a couple hours. Do this project one piece at a time, and it still first my original premise. Just go with me on this point, okay? The thing is, that third project is so cool that I just couldn’t resist it.
I’m going to start with two small projects that will never leave your shop. These are personal satisfaction pieces that will only make you a better woodworker for when you tackle those legacy projects. As an added bonus, these are both pieces you’ll want to use to tackle that final project in the column
1. Quick and Easy Router Table
This plan is one of the thousands you’ll find in our very own website, after you sign up, of course. But today, I’m pulling this plan out to the blog and giving it to you for free.
A router table is essential for any excellent wood shop. Sure, you can buy all kinds of fancy tables (I confess, I have one) but you don’t need to. In just an hour or two you can build your own.
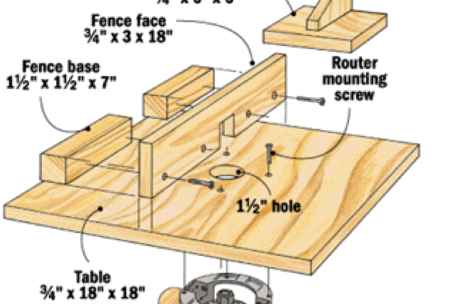
This project is very easy, and is also a remarkably effective router table. Begin with a ¾” thick piece of plywood cut to 18 inches square for a base. You could use MDF if you prefer, but I personally stay away from that stuff. It’s affinity for absorbing moisture and contorting itself all out of shape makes it one of my least favorite building materials. Frankly, I never use it. For anything. But, I digress.
On the bottom side of the plywood, find the exact center by drawing lines from opposing corners. X marks the spot where you will drill the hole for you router bits to protrude through. Remove the base plate from your router and position It perfectly over this spot. Mark the center hole, and the mounting holes for tightening your router baseplate to the table. Then, drill them out to the appropriate sizes for your router. The mounting screws will have to be countersunk on the table top, so they lay flush and don’t conflict with the work being shaped.
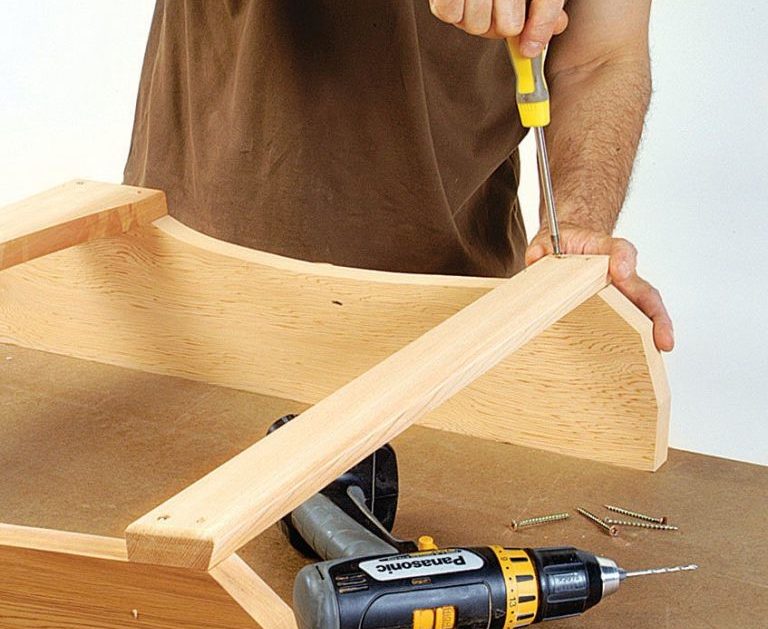
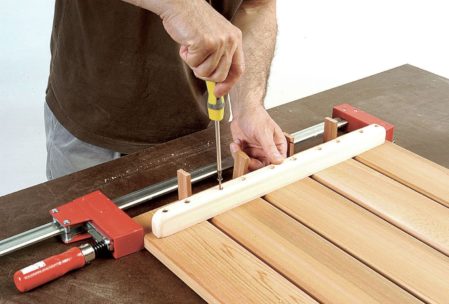
The fence is simply a 1×3 face piece and two 2×2 bases. You’ll need to notch out the fence about two inches wide and 1 ½ inches high at the center point, to make room for the router bit. It is attached to the 2×2 bases with glue and screws. Oh, and don’t forget to also build the push block shown in the image above. You don’t want your fingers too close to a high-speed router blade!
To use this very simple router stand, mount your router from the bottom side, and set the table up on a couple of sawhorses or clamp it to the edge of your bench. The positioning of the fence is adjustable by using clamps on the bases to hold it in place.
Sand everything down nice and smooth and apply a high-quality paint or other finish, and you’re done! In no time at all, you have created a handy, useful, and easy-to-store router table.
2. Feed Table for a Table Saw
If you’re like me, shop time is your time. It’s okay if a buddy or two stop by once in a while. But, for the most part, wood working is a solitary pursuit where my favorite company is, well, Me! The problem with that is, sometimes you just need an extra set of hands to, for example, help guide a large piece of wood through the table saw. Here’s a plan, also from our website for a foldable feed table that you can mount right to the saw stand. It will always be right where you need it!
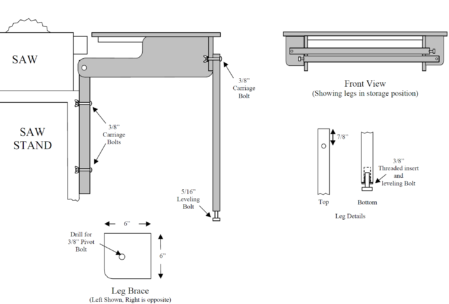
The top is simply ¼” plywood (I would go ½” for a sturdier surface). The support structure and legs are simply 2-inch pine, and the leg braces are ¾” plywood. Cut the pieces to the dimensions shown in the diagram below, verifying that the leg lengths are correct to match your table saw (you might need to adjust this measurement slightly). Note that one leg is shorter than the other (by 2”), so it will be positioned lower on the leg brace, this allows them to be stored as shown in the diagram.
Mount leveling bolts in the base of the two legs. Now sand and paint the entire rig (to match the color scheme of your saw, of course). The feed table just bolts together with a handful of carriage bolts. Use a rubber washer between the leg and the bracket. This adds friction and helps hold the leg in place during both use and storage. Nothing more to it!
3. Adirondack Chairs and Table
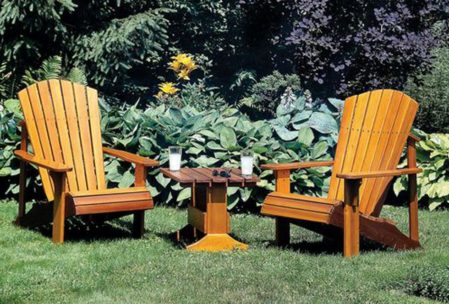
The classic styling of an Adirondack Chair just beckons you sit down. And, why not? These chairs have been around for many years and no one has improved on them yet. Thing is, despite their durability and timeless design, they’re not really hard to make. With the investment of just one afternoon, you’ll be able to spend many afternoons hanging out in them. Plus, the addition of the table makes this set truly irresistible.
This plan comes courtesy of Popular Mechanics. These chairs and table are made from cedar, which is always the top choice for outdoor furniture. It’s resistance to water and pest damage is legendary.
Materials list per chair (all wood is cedar)
Side Rail (2) – 1×5 ¼ x33 ¾
Top Back Rail – 1×4 ¼ x23m ¼
Bottom Back Rail – 1×3 ½ x23 ¼
Seat Slats (9) – ¾ x 2 ¼ x23 ¼
Back Slats (7) – ¾ x3 ¼ x35 ½
Front Legs (2) – 1×4 ¼ x20 ½
Back Legs (2) – 1×2 ½ x29
Arm Brackets (2) – 1×2 ¾ x6 ½
Arms (2) – 1×5 ¼ x28
Table:
Feet (2) – 1×5 ¼ x16
Cleats (2) – 1×1 ½ x19 ¼
Legs (2) – 1x5x16 ½
Stretchers (2) – ¾ x5x17 ½
Slats (5) – 1×3 ¾ x24
You will also need No. 8 deck screws in both 1 5/8” and 2 inch lengths
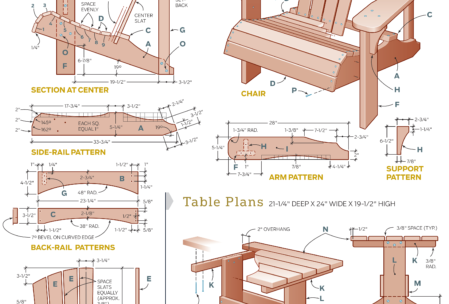
There are a lot of intricate measurements to get the correct bevels, curves and shapes to this chair, so consult the drawing below carefully for the details. Using a jigsaw, first cut the siderail and back rail pieces, and sand them smooth. Cut the seat slates next.
Remember that router table we made as our first project in this column? Set it up because you’re going to need it. Once the seat slats have cut to size, round the edges with a quarter-round router bit. Do the same with all edges on the rails that won’t be coming into contact with other pieces.
Note the bevels required on most of the seat pieces. This is a job for a hand, miter, or table saw.
Assembly starts by putting just one screw in each end of the lower back rail into the seat sides. Next, mount that number 4 seat slate, again with just one screw on each end.
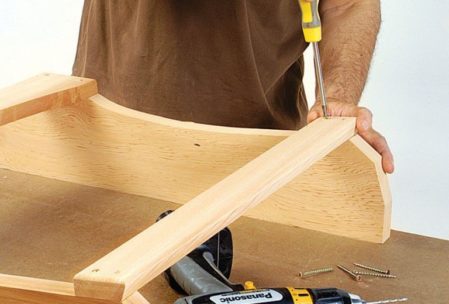
This is critical. Now you have to get this assembly perfectly squared up by measuring the opposite diagonals and adjusting the existing framework until those diagonals are exactly equal. Mess this up, and your chair is going to become a rocker, and not in a good way. Once it all squared up, drive that second screw home in each of these joints.
Use a 1-inch spacer to help mount the remaining seat slats. But, there are some weird angles involved here, so it’s going to take a bit of eye-balling to get the spacing just right.
Cut the front legs, shape the edges with the router, and mount them in place.
The back slats are next. Note that they are all tapered – wider at the top than the bottom. Start them all with blanks that are 35 ½” long. Trim these slats so that they are 3 ¼ inches wide at one end (top) and 2 ¼ inches at the other end (bottom). Either a table saw or band saw with an fence with angle is your best bet for this task. Smooth all of the surfaces, and router all of the edges. The curve at the top is probably best way to do on a bad saw.
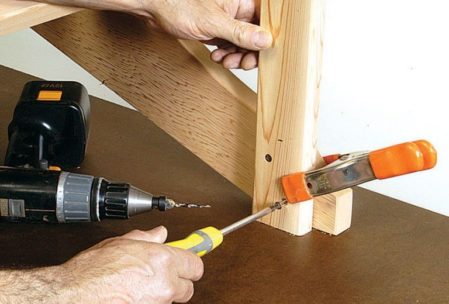
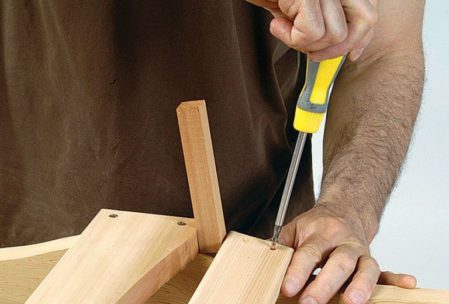
Cut the rear legs to size, with a 64° angle at the top, and screw them into place. The top back rail gets screwed onto that angled edge, and the slate are mounted to the front of it. Your Adirondack chairs are really starting to take shape now. All that’s left is to mount the arms.

On the front legs, clamp the underarm support into place and fasten it down with a pair of screws.
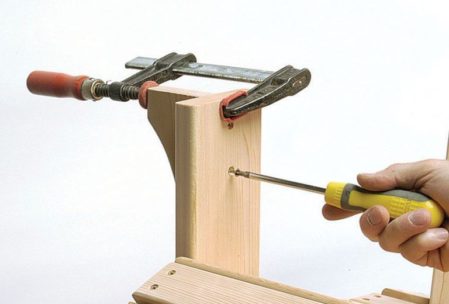
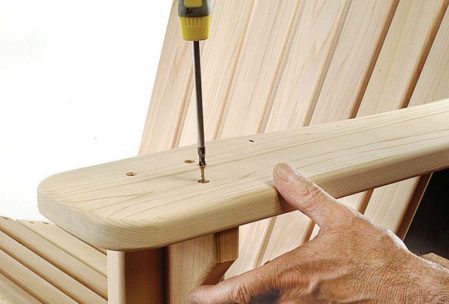
Then attach the arms, and your chairs are ready for finishing.
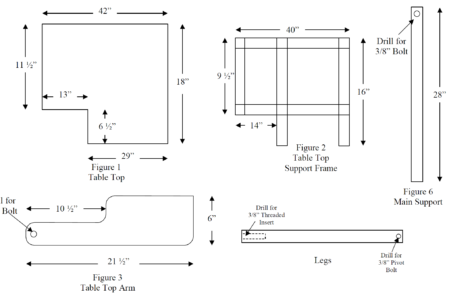
Now, let’s move on to the matching table. You already know how to build this, because all edges are routed the same way, and everything is screwed together. Do all of your cutting first, then run all edges through the router. The only tricky part here is the shape for the two feet. Draw the pattern on the wood, and make the curved lines with your jigsaw, before smoothing and routing all edges.
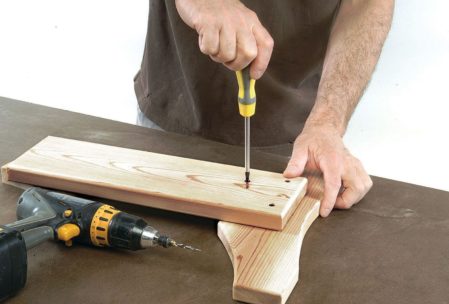
Three screws mount each foot to its leg, and a pair of stretchers span the legs. With the bases completed, it’s time to move on to the top.
Here’s a good way to get the spacing for the top slates perfect. Place 3/8” spacers between the board on each end, and clamp this assembly together.

Then screw the cleats to the underside of the top slats, making sure the spacing between the cleats matched the spacing of your leg subassembly. Screw the legs to the inside of the cleats, and smile.
Lightly sand the chairs and table with 120-grit sandpaper. If you built your chairs from cedar, don’t expect that glassy-smooth finish of other hardwoods. Be sure to wipe the dust off and break out the finish. Since the best use of chairs is to live outside, be sure they get at least three coats of good weather-resistant finish. To make sure they last a long time, I suggest you cover them or take them inside when the weather turns foul enough that you just know you won’t be using them for a while.
Conclusion
So, there you have it. Five pieces that don’t take forever to build, but will serve you well for a lifetime. Two of them make your time in the shop a little better, and the others make your time in the back tard as good as it can be. I would say that’s a pretty successful day in the shop.
Leave a Reply