How to Build a Wooden Chess Board?

One of the great things about having the tools and skills to complete carpentry jobs is that you can make almost anything you want with ease. With some simple equipment and a dedication to detail, it is easy to learn how to build a wooden chess board.
While building a box might seem daunting at first, it doesn’t have to be difficult. Most people would assume that creating a DIY chess board out of 64 square blocks could be time-consuming, but when it’s all said and done, you’ll be quite proud of your handiwork.
Don’t be afraid to build a wooden chess board; just grab your table saw and prepare to put your woodworking skills into action.

Top-Notch Materials for a Quality Project
The key to completing any quality woodworking project is to start with top-notch materials. Pick two contrasting kinds of wood such as maple and walnut. Make sure it is dry and straight.
The chessboard will be made up of 64 equal-sized square blocks. If these corners aren’t properly aligned, you are going to notice the gaps due in part to the contrasting color choices. We highly advise against cutting and gluing 64 separate blocks. Instead, use eight strips of wood which will make up the squares.
If you have an old wooden table lying around that you were planning to get rid of, you might be able to do this project even easier! Check out this idea to create a custom chess board from an old wooden table.
Creating the Checkerboard Design
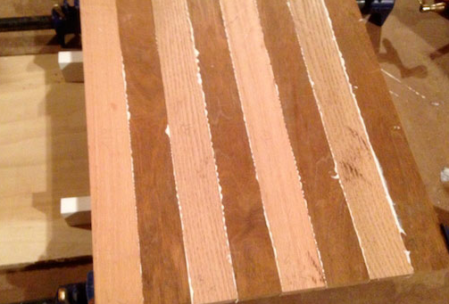
Start by cutting four strips of both wood choices. You’ll want them to measure two-inches wide, then edge-glue them to each other while ensuring they are perfectly aligned.
Once your glue has dried, crosscut the assembled panel with your table saw to true up one end. This will leave you with eight 2-inch wide strips of wood again. Rotate them properly and glue them back together but this time alternating the colors to create your chessboard design.
Wait for the glue to dry and sand the surface to remove irregularities. You’ll notice that the grain will run in varying directions because of how you constructed it, so don’t be afraid to get out the drum sander.
Your next step to build a wooden chess board is to groove the edges for the splines. Make some passes with the table saw while the blade is set to ¼-inch. Next, plane a light chamfer on the top surface and sand it to the final grit.
Detailing the Box with Coving
If you’ve built the lid as if it were part of the sides, now you can cut it free with the table saw. To reinforce your miter joints, most people will use a spline to add additional strength.
Coving the sides of your box is best done before you finish the build. Simply pass the wood on your table saw at an angle taking light cuts. For a cove, you want to bevel your blade at 45-degrees.
As a tip to make your DIY chessboard easier, clamp your straight-edged board as a fence on the saw before making several passes.
Put it all Together
Once you’ve completed coving, cut your side pieces and miter them. Cut 1/8-inch thick x 1/8-inch kerfs to use as splines on the mitered ends. Your next step is to cut the ¼-inch x ¼-inch groove located inside the box sides. You’ll do this with plywood but make sure you don’t glue them as they must have some float to them.
Sand the inside of the box while using masking tape to catch any escaping glue. Dry assemble your box and make sure everything is going to fit properly. Once you are sure it is ready, glue each piece carefully on a flat surface.
Once everything is square and lined up properly, allow the box to sit overnight. The next day, you can remove the tape and excess glue. Then, cut around the box to remove your lid.
Add Sophistication with a Base
This isn’t a necessary step, but to create a more sophisticated look, you’ll want to build a wooden chess board with a base. Do this with two pieces of ¾-inch walnut measuring 1 5/8-inch wide and ¼-inch longer than your sides. Miter your ends and stick them together back to back with some double-sided tape.
On your center line, you’ll want to drill a ¾-inch diameter hole located 2-inches from either end. Next, cut directly through the center with this length. Cut any waste away and clean up with your block plane plus rasp. Miter the four sides together and glue them to make a base.
After that is complete, simply glue it to the bottom of your DIY chess board.
Finishing Touches to Your DIY Chess Board
Mortise your hinges to the box and the lid. Then, sand the outside and finish off the piece however you choose. Some people think it adds a nice appeal by putting some felt inside and including separators. This is entirely up to you and will not affect the quality of your board.
Conclusion
Building a wooden chess board is a great project to tackle to show off your skill and expertise. Once it is completed, the entire family will enjoy sitting around to play games. It might even encourage younger members of the family to get involved with woodworking as well. A great place to start would be with our 3 Easy Woodworking Projects for Kids. Together, you and your family can enjoy the great craft of woodworking.
Leave a Reply