The Ultimate Guide to DIY Coffee Table Plan
There isn’t a living room in the world that doesn’t have a coffee table sitting in front of the sofa. It is probably the single most common piece of furniture ever made. Coffee tables get abused. Drinks, hot and cold, get set on them. Food gets spilled on them. Flower pots create water rings. Magazines get tossed on them. Cats walk over them. This lowly piece of ubiquitous furniture gets almost no respect.
We’re going to change that today. I’m sure you remember our blog about building a fairly basic coffee table . It’s a good plan that will give you a perfectly good, serviceable coffee table. Build one, and you can certainly be proud of it. But let’s say you want to go a step beyond the basics. How do you make what is essentially just a rectangular tabletop held up by short legs into something truly unique? I have a couple of ideas.
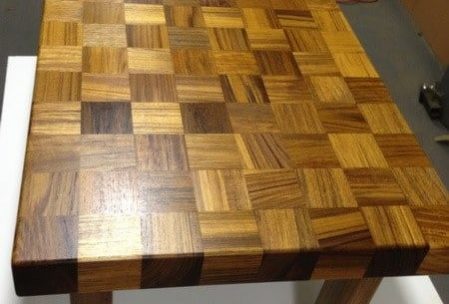
The Chockablock Coffee Table
If I told you my first Ultimate Coffee Table is made of 116 pieces of wood, 8 steel brackets, and 32 screws, would you be impressed or would you run for the exits? Well, before you go scampering off with your tails between your legs, just hang with me. It’s not as overwhelming as the parts list might seem.
The example shown here is actually made from Teak wood that was destined to be thrown away. So, this particular specimen is not only beautiful, but also a wonderful way to reuse scrap wood. Teak is an extremely durable, scarce, and expensive wood, so finding this much scrap Teak was an extraordinary find. But you can adapt this design for any high-quality hardwood.
In fact, you could even choose two different types of hardwood (Maple and Walnut come to mind) to create some gorgeous patterns to the design. If you do that, think beyond just the checkerboard concept. You could use the darker material to create a smaller rectangle by using it only in the second layer from the outer edges. Or you could alternate dark blocks between the second and third rows to create a zipper design. Be creative!

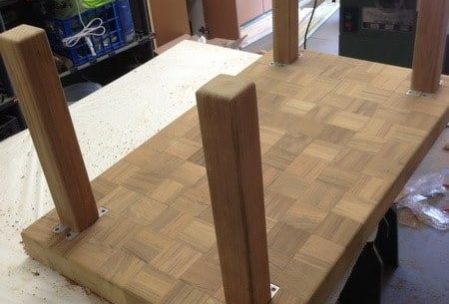
Whatever lumber you choose, the 112 pieces for the top (8 blocks wide and 14 blocks long) are cut into perfect cubes. Lay your pattern dry, with the topside up so you can visualize what the final arrangement will look like. This is a bit like putting a jigsaw puzzle together without being able to see the picture on the box. Use your own creativity to arrange the colors and grain of the blocks the way you want them. The beauty of having perfect cubes is that each block gives you 6 possible faces to use for the top.
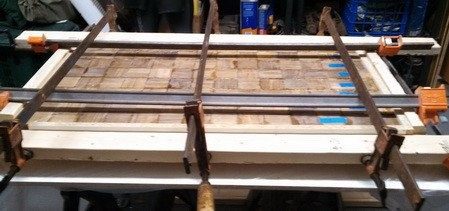
When you are satisfied with the arrangement, apply your wood glue to the pieces and tightly clamp the entire top together. While that dries, cut the four leg pieces to the desired height. Mount two flat steel brackets to the top of each leg.
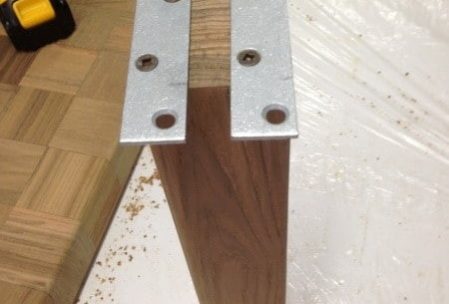
When the top has dried, use a router to carve out enough depth in the underside of the tabletop to allow the steel brackets to fit flush with the bottom. With the router bit of your choice, create a smooth edge to all corners of the tabletop. Sand and finish the tabletop and the legs before assembling them.
There are a couple of variations to this design that could be fun. For one, you could actually make the legs part of the top, by inserting them in the appropriate spots in the pattern in place of the smaller blocks. I would caution that if you choose to do this, I would still suggest mounting some “L” brackets to the inner faces of the legs to help strengthen the connection with the rest of the pieces. You could also use the legs as the very corner pieces of the top. In this case I would suggest using dowels to pin them in place and build strength. The dowels could be entirely hidden, or even go all the way through to become another design element. One other possibility is to continue the square block concept all the way to the floor. Glue and dowel blocks together to build the legs. You could even twist the blocks, say 15° at each joint.
See what I’m getting at here? The reason I think this is an ultimate coffee table design is because there are so many variations you could dream up to truly make your version unique.
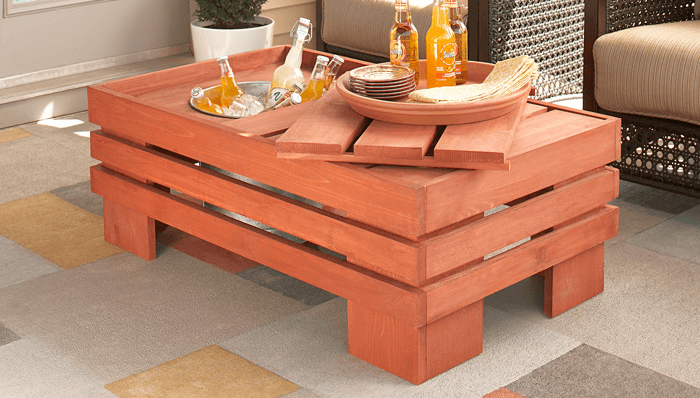
The Beer Drinker’s Coffee Table
Got a Man Cave or a Sun Porch? Hey, even the couches in places like these need a coffee table. But, let’s face facts; nobody drinks coffee in a Man Cave! Okay, so let’s call this this amazing twist on the concept a Beverage Table. I like it already!
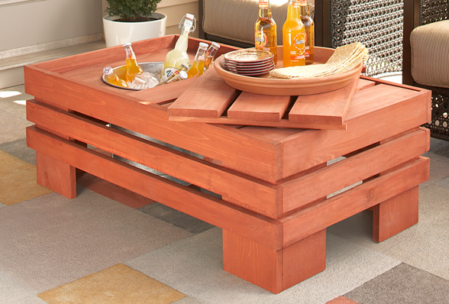
The idea comes from our friends at Lowe’s, and what a great idea it is. This is a table for couches that are used for watching the game or enjoying relaxing times with friends. No 4 o’clock tea parties on this table, please!
This table is made from Cedar, which is an excellent choice for an outdoor table because of Cedar’s famous ability to resist water, weather and insects. It is also one of the most beautiful woods you can choose.
The Tools
Tape measure
Pencil
Table saw or miter saw
Jig saw
Drill and bits
Clamps
#2 Phillips screwdriver or driver bit
Paint brush
The Materials
4 – 1 x 3 x 10 cedar boards
1 x 8 x 8 cedar board
2 – 1 x 4 x 8 cedar boards
2 – 1 x 6 x 8 cedar boards
2 x 2 x 8 cedar board
3/4 x 24 x 48 sheet treated (CDX) plywood
1 box 1-1/4-in deck screws
1 box 1-5/8-in deck screws
1 box 2-inch deck screws
1 quart semi-transparent Redwood stain
Waterproof wood glue
1 Galvanized Steel bucket
The Cuts
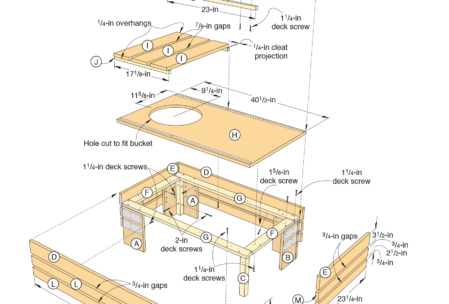
For the legs you need to cut four pieces (A) from a 1×8 8 to a length of 11 ¾”. Then rip what’s left of that board to 6 ½” wide and cut the side legs (B) from it. Cut the 4 upright pieces of the frame (C) from a 2×2 to the same length.
Cut the upper of the 3 slats next. Use a 1x4x8 to make two 42” (D) and two 23 ¼” (E)slats.
Use a 1x3x8 to cut the short (F) and long (G) frame members. Also cut the bottom two long (L) and short (M) slats.
Rip the 1x6x8 to 5 inches wide for the top slats (I), then crosscut those seven pieces to the proper lengths.
Finally, let’s cut the plywood (H). Cut a 40 ½ X 23 ¼ – inch piece. The final cut is to create the opening for the bucket. The rim is what is going to hold your bucket in place, so measure the diameter of your bucket minus the rim. Mark a centerpoint in the plywood where you want your bucket to be and use a compass to draw the circle. Cut it out with a jigsaw, and sand the edges clean.
The Build
Make the legs first. The edge of the side leg (B) is butt-jointed to (A) and screwed to the corner cleat (C) using 2” flathead screws. Be sure to pre-drill pilot holes because we are using cedar and it will split if you don’t drill pilots. Once you have the four legs built, attach the top pieces of the frame (F) and (G) with 1 ¼” flathead screws.
I suggest building the end pieces next. Mark a line 5 ¼” above the bottom edge of each side leg and clamp the lower slat so that the bottom of the slat is on that line. The slats get mounted from the inside using 1 ¼” flathead screws and waterproof glue so that none of the hardware shows from the outside. Put four screws in each end of the slats and legs. Using a ¾” spacer, attach the middle and top slats in the same manner. The top slat should also get pocket hole screws put into it at 2 or 3 points along the inner frame pieces for extra strength.
The long slats are cut to overlap the edges of the shorter side slates, so align the bottom slat in this manner and fasten it to the legs in the same glue-and-screw manner. Install pocket screw along the top slat in 3 or 4 places.
Now, all that left is the top. The underlying cleats for the covers should be mounted ¼” in from the sides, and ¼” in from the end to allow for the necessary overhang when the top is closed. Align the top cleats 7/8” apart and fasten with glue and screws from underneath.
The build is done! Now all that’s left is to sand, sand, sand, and then apply a nice waterproof redwood stain. Let that dry for a while, fill the bucket with ice and your favorite beverages, and kick back, my friend. You just built an awesome coffee table that will be the center of attention at any summer party.

This is a terrific, um, coffee table concept offered up by Lowe’s, and I can’t wait to build one. After seeing this piece, I now think that no Man Cave, Sun Porch or Backyard patio is complete without one.
Conclusion
Well, there you have. My idea of a couple of coffee tables that truly deserve to be called “Ultimate.” In fact, they are both so ultimate in very different ways that you just might have to build both of them.
Leave a Reply