2 Easy DIY Wood Toys Plans That Your Children Will Love
As woodworkers, we are always looking for new things to build. Tables, chairs, cabinets. All kinds of pieces to beautify our homes with the elegance of personally handcrafted fine wood furniture. But when we think about what our children would like for their birthday, for example, we run to the store and buy the latest “hot“ toy. It is usually some plastic gizmo that will lose its appeal within days, when the next new craze hits the shelves.
How about heading for your woodworking shop instead? I’ve got two easy DIY wood toy plans that your children will love.
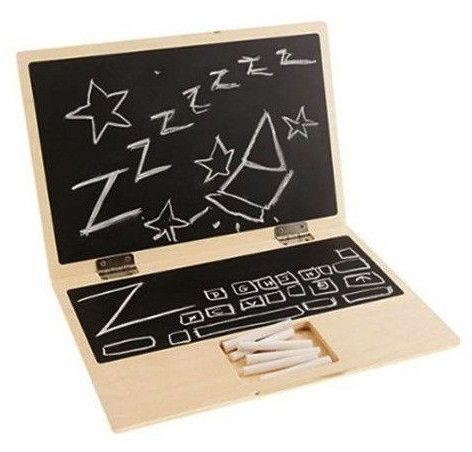
Chalkboard Laptop
As a parent, I know that my kids watch everything I do. That can be a scary thought. But let’s take fear out of that by building something they can have fun with, even as they mimic us. Now, when you open your laptop to log onto Joinery Plans website, your son or daughter can open their chalkboard laptop and draw while you surf.
Materials
- (2) pieces of wood 12”x9” (I used 7/16” finished plywood, but use the wood of your choosing. A hardwood version would be beautiful!)
- (2) 1 ½” hinges and screws to mount them
- Chalk vinyl
- Small strong magnet
- ½” steel disc
- Paint or stain
Tools
- Router and bits
- Drill and bits
- Saw
- Sandpaper
The Build
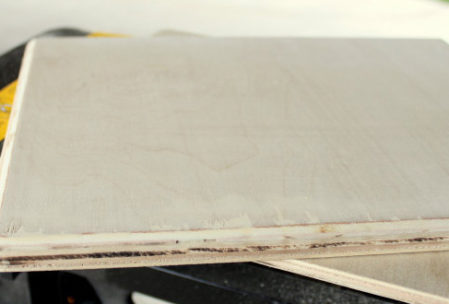
How you cut the wood is going to depend upon what you are using. For our plywood version, we used a table saw to cut the two 12”x9” pieces. With your router, slightly round all of the edges. This is a toy, so we want to make sure there are no sharp corners.
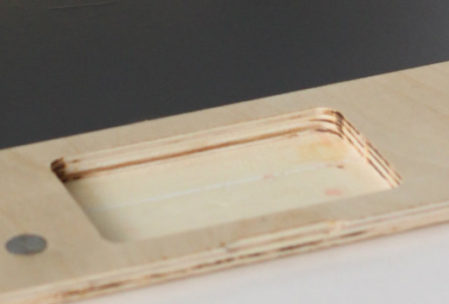
Next, create the chalk tray. Using the router, plunge cut an area about 4 inches long, 2 1/2 inches wide and a half-inch deep on one piece of wood in the same area that your laptop has its touchpad.
Lay your two pieces of wood next to each other and mark the hinge outlines. Fire up the router and carve insets for the hinges that will be deep enough to create a slight binding of the boards when the laptop is opened. This will keep the “screen” upright instead of flopping all the way back.
You should be able to find powerful 1/2” magnet discs at the hardware or hobby store. Countersink one of these in each of the front corners of the base, and a piece of steel (sheet metal or a nail head) in the matching location on the screen piece. Secure them in place with wood glue.

Check the mounting instructions for your chalkboard vinyl. You may have to paint or stain before you apply it, or you might have to apply it first.
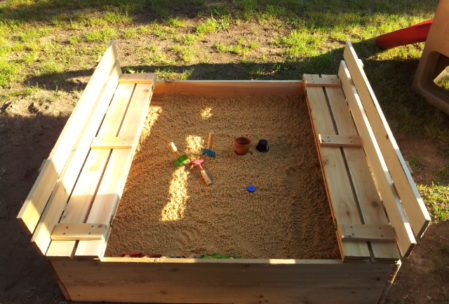
The Ultimate Sandbox
Keep the cats, leaves and other debris out of the sandbox, and make it a whole lot more fun to play in with this fantastic design that even has built-in benches! This sandbox is made of cedar to be weather-resistant, but also safe for the kids. The chemicals used for pressure-treated lumber are not child-friendly.
Materials
Cedar Lumber Needed:
- (4) 1”x6”x8’
- (6) 1”x4”x8’
- (2) 1”x3x8’
- (1) 4”x4”x4’ post
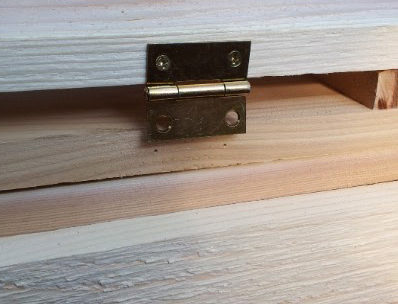
- (12) 1 ½” brass hinges
- 1 Box 1 ¼” exterior wood screws
- Sandpaper
Tools
- Miter or Circular saw
- Drill and bits
- Tape Measure
- Square
The Pieces
Cut the 1×6 boards exactly in half, so that you have eight equal length pieces. These will form the box. Cut the 1×4’s the same way. They will be the top. From the 1×3’s, make six 7½” pieces that will become the seat braces, and four 17” pieces that will become the back braces. Now cut four 11” long pieces of 4×4. These are the corner braces in the box.
The Build
At every step of the process, use your square to make sure you have the corners true, and predrill all of the screw holes. Cedar is unforgiving and will split if you don’t drill pilot holes. Our sides are going to be two boards high. Build a side by screwing a 4×4 to each end of the first board. Add the second board, being careful to keep the two boards as tight together as possible, or sand will leak out. Build a second side in the same way. These 2 sides will form the “long” sides of the box, because when you mate the remaining boards to them, they overlap the ends of the first two walls. So, the short sides will be 1 ½” shorter than the long ones.
Set your box in its final site. Make sure it is absolutely square. It’s a good idea to lay down some landscaping material or other weed barrier to keep things from growing up through your sandbox. You can actually staple this to the inside of the box several inches above the ground to keep sand from squeezing out from under your box, too.

Let’s build the top. Lay out six of the 1×4’s, leaving about a half inch gap between them and squaring them up with the box sides. Screw the outermost two pieces to the box (drilling pilot holes first, of course). Using three of the 7 1//2” braces, let’s build the seat. These braces will go on the underside of the 2 center pieces of our top. When it is flipped open, this will form the bench seat. Screw the two pieces together, placing one of the braces about 3” from either end and the third brace right in the center.

Lay the finished seat on top of the first two boards, using your carpenter’s pencil as a spacer to maintain the ½” space between boards. Place three hinges along this edge, one in the middle and the other two about 6” from either end.
The seatback is next. Lay only the bottom board for the seatback (this would be the fifth board in from the end) on top of the opened seat, and install your hinges. Remember, these hinges swing in the opposite direction from the first set, so mount them accordingly.
The final board is attached to the seat back using the remaining 17” pieces. Screw boards number 5 & 6 to this board, making sure that both of these slats are very square. When you fold the seat open, these slats act as the braces for the seatback. I also suggest mounting a small piece of your wood scraps on the outside of the box for them to rest on.
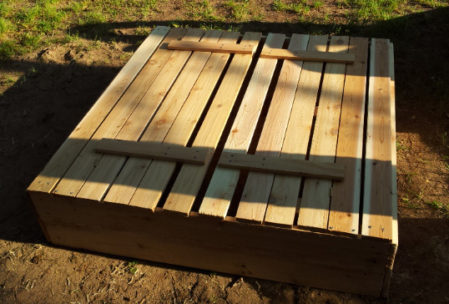
Now, build the other top exactly the same way. Then sand everything, paint or stain it, or even leave it au natural. Finally, fill it with sand and let the fun begin!
Leave a Reply