DIY Plan for a Wooden Whirligig

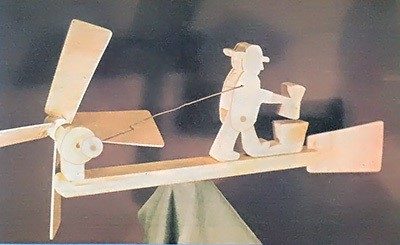
The Whirligig is a glorified wind vane that harnesses the power of the wind to move a little cutout of a (usually) human figure back and forth in a repetitive motion. Sometimes this poor little puppet is endlessly chopping or sawing the same piece of wood. Or it’s a golfer who swings away relentlessly at the same golf ball, only to miss again and again. And again. And again. Or it’s a washwoman scrubbing the same piece of wooden clothing back and forth, and back and forth. And back and forth.
You get the idea. A Whirligig does the same thing in a motion so repetitive that it’s just flat-out ridiculous. And yet, watching one is so soothing and mesmerizing. You can sit and watch one of these things go fruitlessly about its task for hours and enjoy every minute of it. Perhaps that’s why nearly every woodworker has more than a few Whirligig’s to his or her credit. It’s why we….
Wait, what’s that you say? What? You have never made a wooden Whirligig? How on earth did you miss that day in Woodworking school? Regardless of your skill level as a woodworker, no sawdusty resumé is complete without a Whirligig. So, let’s go back to school and dust off some of those beginner tools and skills I wrote about here.
Fanciful wind vanes have been around ever since we figured out that if you mount a flat piece of wood on the end of a stick and allow it to spin freely on an axis at its fulcrum, the thing is going to point into the wind. Then, if you put a propeller on the front end, you have created something that is harnessing the power of that wind. But what to do with it? While a giant wind turbine can turn this force of nature in electrical energy, our little 4-inch blades just don’t have enough gusto.
I have no idea who first got the idea to create a little wooden character that would harness this minute tidbit of energy to perform a monotonous chore hundreds, even thousands, of times every day. But the idea stuck and endless variations have been devised.
One of my favorite designs uses a very different kind of propeller. Where most Whirligigs have the propeller mounted at the very tip of the nose, this one actually has it mounted on the side! Put the image of a paddlewheel boat in your mind, and you get the idea. An interesting aspect of this Whirligig design is that no matter how fast the wind blows, the action remains at a fairly constant speed. The side-mounted paddles require only the faintest wisp of a breeze to get started and then rotate at nearly the same speed regardless of the wind.
The plan comes from a 1981 article in Mother Earth News as a testament to how the Whirligig concept hasn’t aged a bit. The author points out that the basic design can be adapted to any number of characters and activities.
The secret to this design is the propeller, which is known as a “wind-quartering” design. The wind blows across the faces of the blades at a very flat angle, rather than through them at a steep angle. Because the blades are set at a fairly small angle to the shaft they are rotating, this broad-sided wind pressure doesn’t need to be very strong to get things spinning.

On the other end of the driveshaft is a wheel. A small wire “shaft” is mounted at an offset to turn the rotational energy of the driveshaft into a back-and-forth movement. The other end of this shaft is attached to our poor soul who, thanks to a hinged point in his design, is destined to spend the rest of his existence doing the same action every minute of every day and night until he falls apart. So, how to build a whirligig?
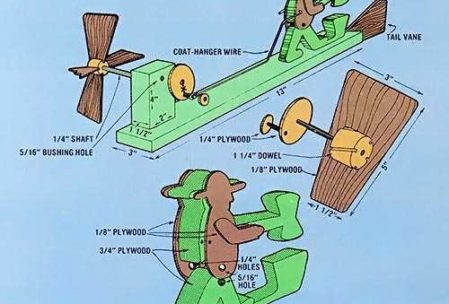
Using 1/8-inch outdoor plywood, cut five fans blades in a trapezoid shape – 5 inches long, 3 inches wide on one end and 1 ½ inches wide on the other. Sand the edges smooth. Cut four dado slots at about a 15° angle across a 1-inch thick dowel that is 1 ½” long. Drill a ¼” hole into the center of the dowel on one end and glue a ¼” dowel in it. The large dowel is the hub for the fan blades and the smaller one serves as the driveshaft that transfers the energy. Glue the fan blades into the dado slots on the hub.
While the glue is drying, let’s build the base of our Whirligig. Cut a piece of wood 3 inches wide and 13 inches long. Cut a vertical dado in the back end of the piece and glue the fifth vane into it to form the tail. Cut a 2-inch block from a piece of 2×4. Mount this block near the front of the base and drill a hole large enough to insert a 5/16” bushing into each side of this block.
Now add some sort of lubricant (I think bicycle chain lube is the best for this task) to the driveshaft dowel and slide it through the bushing. Cut a 1 ½” circle of plywood. Drill a hole in the center to accommodate the end of the driveshaft dowel, and another hole near the outside edge. Glue this piece to the end of the driveshaft and a short piece of ¼” dowel into the hole on the outer circumference of the wheel. Bend the end of a piece of stiff wire (think clothes hanger wire) loosely around this short dowel, and cap it with another small circle of plywood.


The other end of this wire gets attached to whatever character you decide to create with your jig or scroll saw. The example used in these illustrations is the classic “Guy chopping wood” design, but if you search for images of “whirligig” on the internet you will find hundreds of variations. The real challenge isn’t in building one; it’s in building one that has never been built before.
Leave a Reply