The Ultimate Woodworking Plan For A DIY Desk
Walk through any office furniture store and you’ll see dozens of different desks. Unless you’re looking to spend thousands of dollars on a finely crafted wood desk, you’re going to end up with some variation of a glass and metal pipe contraption, or a pressed-wood piece of junk. Yeah. Beautiful stuff. So you end up jamming it in some little room in the back of the house that you dub your “office” and hope no one ever sees it.
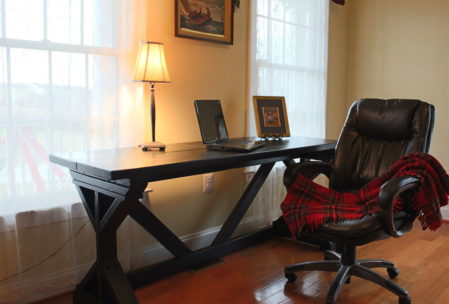
Here’s a better idea. Go to the lumber yard and pick up some 2×4’s, a couple of 2×12’s, a 1×4, and a box of screws. We’re going to build a desk so unique (and so strong!) that you’ll be proud to put right in your living room.
The Materials
- (2) 2”x12”x48” You can buy an 8-footer and cut in half when you get home
- (5) 2”x4”x8’
- (1) 1”x4”x8’
- Wood screws 92 1/2
- Glue
- Paint or stain.
The Tools
- Table or Miter Saw
- Drill and wood bits
- Nail gun
- Pocket Hole Jig
- Sander
- Tape measure
- Pencil
The Pieces
Let’s get all of the sawing done right away. Start by cutting your 1×4 into four 19 ½” pieces. From the remaining 1×4, cut four 3 ½” squares that will become the feet of our desk. Next cut two pieces of 2×4 to a length of 20” each. These will form the upright post in the center of the leg. Now cut four pieces of 2×4 to a length of 22 ½”. This will become the outermost layer of the legs. We will need three horizontal 2×4 supports 37” long. If you got an 8-foot 2×12, cut that in half now.
Here’s a slightly tricky one for you. We need to make two angled support beams with a 120° angle to each end. Cut two 2×4 pieces to exactly 25 3/8”. Each end will now be at a 90°. We need to make it 120°. To do that, set your crosscut to a 30° angle and make the trim, being careful not to remove any wood from the side with the longest angle. Cut the other end with the same angle pointing in the same direction. In geometric terms, you have just created a parallelogram. It has two long sides of equal length, and the two ends are of equal length with identical angles on each end.
Now set your saw to make square cuts again, but angled at exactly 45°. We’re going to be making 24 cuts at this angle, so make sure that saw is set correctly. First, let’s cut the eight supports brackets. The long side needs to be 10 ¾”. Don’t worry about the short-side measurement. If you measure the long side correctly and have your saw set perfectly, the short side will take care of itself. Now we need 4 horizontal pieces for the legs, also cut at that same 45° angle. The long side should be 22 ½”. Put the saw away. We’re done cutting.
The Build
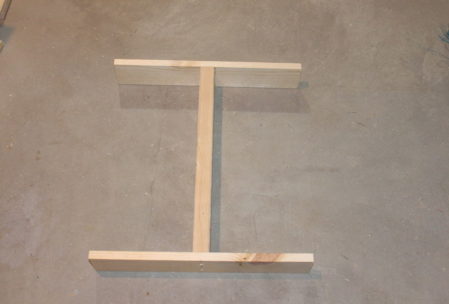
Center the thin boards on each end of the 20” uprights and fasten them with 2 ½” countersunk (and pre-drilled) wood screws.
Then add the 8 short support pieces on the inside angles of the legs. You could use a nail gun, as in these photos, or pocket screws. Either way, spread a thin layer of wood glue in the joint, just to keep things nice and tight.

The next step is to nail and glue the 22 ½” horizontal leg pieces across the face of the thin boards on each end. Keep the angle pointing outwards to build the ends in a sort of pyramid shape. Now nail and glue the 22 ½” pieces on top of that.
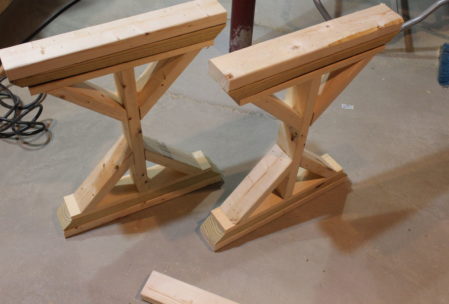
At this point, you should have two identical legs that have a center post, mounted to a 1×4 and two thicknesses of 2×4 on each end, with a pair of braces each way. It’s a good time to sand all of this wood as far as you want to go with it. My design is going to maintain a rough-hewn look, so I’m not too worried about this, but if you plan to add an optional finely finished top to the desk, you may want to get picky with the sanding job.
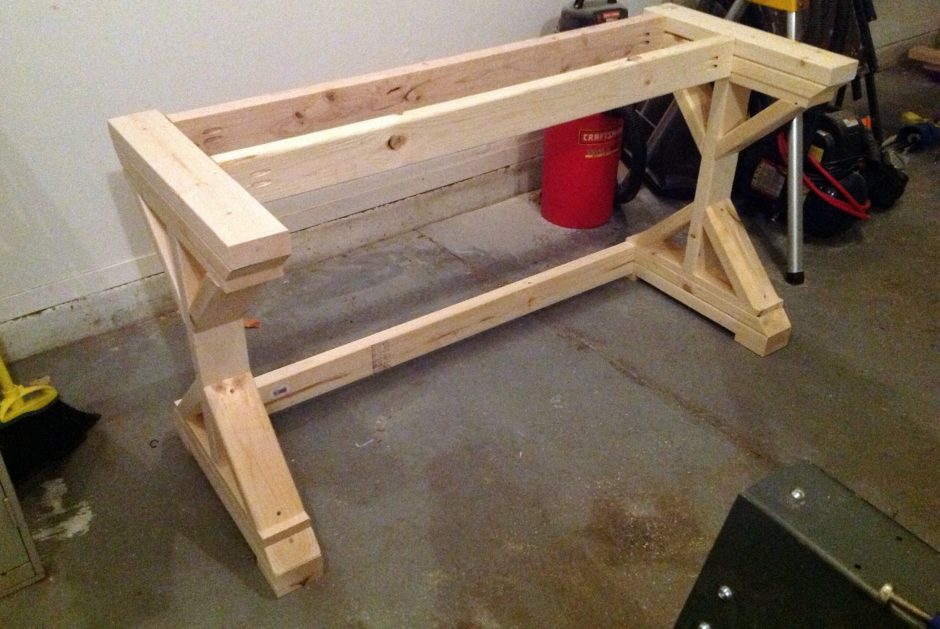
Now, let’s add the horizontal posts to give our desk it’s final shape. Drill two pocket holes on each end of the 3 horizontal support pieces. Then mount one on the top and bottom of the legs on one side. Remember that you will want to put your chair and legs under the desk, so these horizontal pieces need to be mounted only on what will be the back side of your desk. The 120° angled support pieces get mounted with pocket screws between these horizontal supports. Add the third crossmember in the center of what will be top of your desk. Flip it over and nail or screw those four square feet in place.

While it’s upside down, drill some pocket holes in the top crossmembers, and across the tops of the legs as needed to securely mount your 2×12’s that will serve as the desktop. 2 pocket screws in each leg per board and a couple in that center crossmember should do, for a total of 6 per plank or 12 altogether.
Now sand and paint or stain as you desire.
Options
Yes, this is an old-world, He-man looking desk. But the beauty of this design is that it is open to interpretation. If you like the look, but want a smooth worktop, overlay it with a piece of high-grade plywood or even tempered glass. You can finely sand, fill, and paint the legs for a very smooth finish. Instead of 2×12’s for the desk top, you can purchase a piece of countertop, or even granite if you are so-inclined. Instead of using pine, use the hardwood of your choice and give it a beautiful stain. Add a plywood panel with a hardwood veneer face across the backside for a more closed-desk feel. Hang a slide-out keyboard shelf or even a drawer under the front edge. You can even create bookshelves with a miniaturized version of the leg design.
That’s why I call this the Ultimate Woodworking plan for a DIY desk. It’s a basic plan that gives you the option to modify it and create your own expression. Your imagination is the only limitation!
Leave a Reply